Crochet Fox Keychain: The Must-Have Bag Accessory
This post may contain affiliate links. If you buy through them we may earn a small commission at no extra cost to you. Learn more.
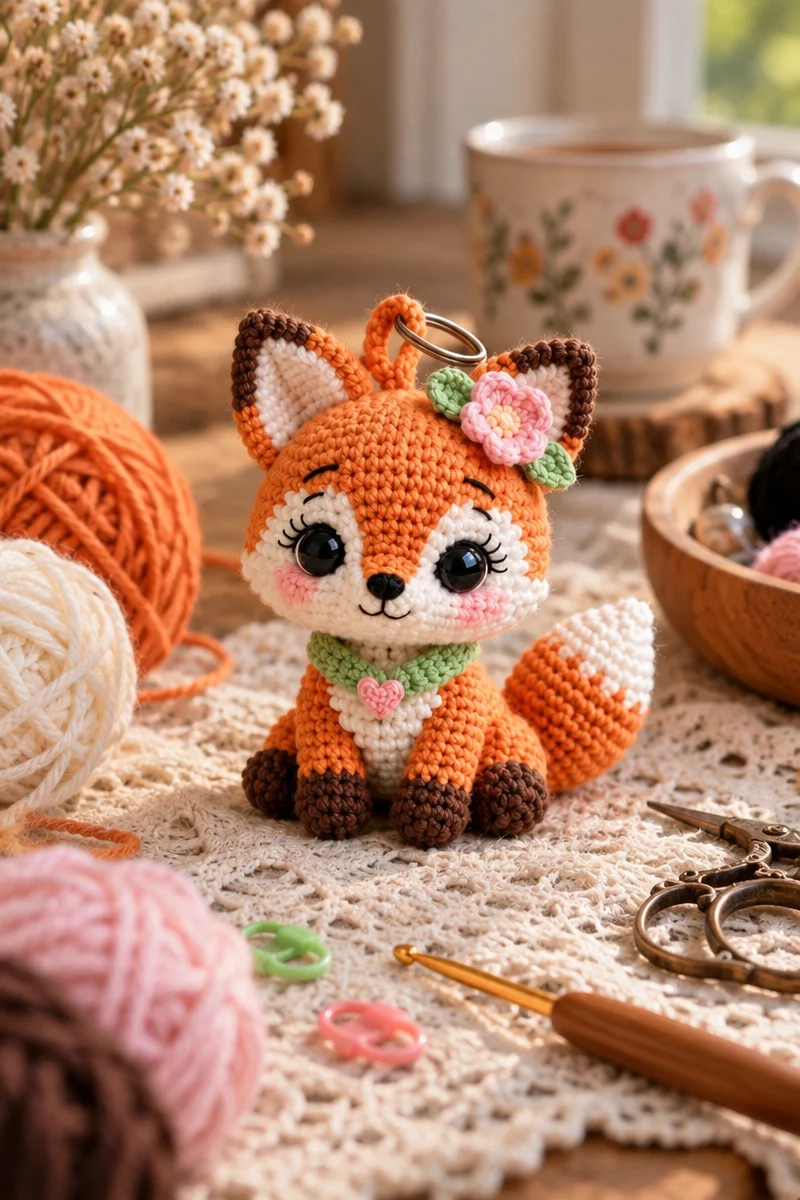
This crochet fox keychain is a small, cheerful project that adds handmade charm to a backpack, purse, pencil case, or set of keys. Its orange body, fluffy tail, sweet face, and tiny flower make it especially appealing as a quick gift. The pattern uses basic shaping and simple crocheted details, so it suits beginners who are ready to practice working in rounds and assembling small pieces.
Thank you for reading this post, don't forget to subscribe!Why crocheters love it
This fox keychain is enjoyable to make because it combines several useful crochet skills in a compact project. You will practice starting with a magic ring, crocheting in rounds, shaping with increases and decreases, and attaching separate pieces neatly.
It is also a practical scrap-yarn project. The orange, white, black, and pink sections require only small amounts of yarn, making this a good way to use leftover supplies. The finished fox is portable and can be worked on during a quiet break, while traveling, or whenever you want a quick handmade project.
The completed keychain makes a thoughtful small gift for a friend, child, teacher, or animal lover. Adding the flower gives it extra personality and makes each finished fox feel unique.
“I loved how quickly this little fox came together. The tail and flower made it look much more special than a typical keychain, and it was easy to personalize with leftover yarn.”
Pattern overview
You will make a small crocheted fox from several components: the orange body and head, facial details, ears, a flower, and a fluffy tail. The pieces are created separately where needed and then assembled before attaching the keychain ring.
The main technique is crocheting in rounds. The head is shaped with increases and decreases, while elongated stitches create texture in the tail. You will also use a magic ring, basic color changes or separate yarn pieces, simple embroidery, and sewing or attaching crocheted parts together.
This is best suited to a confident beginner or intermediate crocheter. The pattern does not provide exact stitch counts or finished measurements, so the final size will depend on your yarn weight, hook size, tension, and the number of stitches used to form each section.
Materials you’ll need
- Crochet hook suitable for your yarn
- Yarn in orange, white, black, and pink
- Stitch markers
- Scissors
- Keychain ring
A smooth yarn is usually easiest for a small amigurumi-style project because the stitches remain visible and the parts hold their shape. Cotton or a cotton-blend yarn works well, although acrylic can also be used if it produces a firm fabric.
Choose a hook that creates tight, even stitches. If your fabric looks loose or stuffing is visible, try a smaller hook. If the stitches are difficult to work into, use a slightly larger hook. The exact finished size will change with different yarn weights and hook sizes.
The white yarn can be used for facial details or other contrasting areas, while pink adds color to the flower or small decorative features. Stitch markers are particularly helpful when working in continuous rounds.
Step-by-step instructions
-
Make the body.
Start with orange yarn and form a magic ring. Crochet several stitches into the ring to begin the body. Keep the center closed and place a stitch marker so you can identify the beginning of each round. -
Shape the head.
Continue crocheting in rounds. Use increases to widen the shape and decreases to create the rounded head. Work slowly and check the shape as you go so the head remains even rather than pointed or lopsided. -
Add the face.
Use black yarn to create the eyes and nose. You can crochet or embroider these details, depending on the look you want. Use white yarn for small contrasting facial details if desired, and secure all ends firmly inside or at the back of the piece. -
Make and attach the ears.
Crochet the ears separately. Shape each one so it has a pointed fox-like appearance, then attach the ears to the top of the head. Position both ears before sewing them permanently in place to make sure they are symmetrical. -
Crochet the flower.
Use pink yarn, or another contrasting color, to crochet the flower. Attach it securely to the keychain assembly or to the fox where it will remain visible. The flower can be positioned beside the head, near an ear, or wherever it balances the design. -
Create the fluffy tail.
Crochet the tail using orange yarn and elongated stitches to produce a fluffy, textured effect. Keep the base firm enough to attach securely. Avoid pulling the elongated stitches too tightly, as this can flatten the texture. -
Assemble the fox.
Arrange the body, head, ears, tail, and flower. Sew or attach each part securely, checking the front and back before trimming any yarn ends. Make sure the tail and decorative flower cannot easily pull loose. -
Attach the keychain ring.
Secure the keychain ring to the strongest part of the finished fox, using a tightly crocheted or sewn connection. Test the attachment with a gentle pull before placing the fox on a bag or set of keys.
Ways to use your finished project
- Attach it to a backpack, handbag, purse, or key set.
- Give it as a small handmade birthday or holiday gift.
- Add it to a pencil case or craft bag for a playful decoration.
- Make several foxes in different colors for a craft-fair display.
- Create matching keychains for friends or family members.
- Use different flower colors to coordinate the fox with a particular bag or seasonal style.
Because this is a small accessory, it is easy to make a coordinated collection without needing much yarn. Always check that the keychain ring and sewn attachments are secure before giving the item to a young child.
Keeping your crochet looking new
The best care method depends on the yarn fiber. Check the yarn label before washing, especially if you combine different fibers or colors.
For most handmade keychains:
- Spot-clean light marks with a damp cloth and mild soap.
- If the yarn label allows washing, hand wash gently in cool or lukewarm water.
- Avoid rubbing the surface, which can cause pilling or distort the elongated tail stitches.
- Press out excess water with a towel instead of twisting the fox.
- Reshape the ears, head, tail, and flower while damp.
- Lay the keychain flat to dry completely.
- Keep it away from high heat, which may shrink or soften some fibers.
- Store it in a dry place away from direct sunlight to help prevent fading.
Do not hang the fox by the crocheted body while it is wet, as the weight of the water can stretch the stitches and weaken the attachment point.
Tips for success
- Use a stitch marker at the beginning of every round so you do not accidentally add extra stitches.
- Count your stitches regularly, especially after working increases and decreases.
- Keep your tension firm and consistent. Loose stitches can make a small keychain look uneven.
- Arrange the ears before attaching them permanently. Small placement adjustments make a noticeable difference.
- Embroider the eyes and nose with short, secure stitches rather than long loose strands.
- Weave in ends carefully because a keychain receives more handling than a decorative item.
- Leave enough yarn for sewing when finishing separate pieces.
- Check the tail’s texture as you work. Pull elongated stitches to a similar length for an even fluffy effect.
- Attach the keychain ring to a strong area, not only to a loose surface stitch.
- Give the finished fox a gentle tug test before using it on a bag.
Customize your project
There are several easy ways to personalize this crochet fox keychain:
- Use rust, cream, gray, brown, or golden yarn for a different fox-inspired palette.
- Change the flower color to match a favorite outfit, school color, or bag.
- Add a white chest, muzzle, or tail tip for stronger contrast.
- Embroider tiny whiskers or eyebrows with black yarn.
- Use a slightly thicker yarn and a suitable hook to make a larger fox. This will increase the finished size and may require a stronger keychain ring.
- Use thinner yarn for a smaller, more delicate charm. Smaller pieces can be harder to crochet and attach securely.
- Try a soft textured yarn for the tail, but make sure you can still see and count the stitches.
- Make a set of foxes with different flower colors for matching gifts.
Changing the yarn weight or hook size affects the fox’s dimensions, firmness, and yarn requirements. A very soft or bulky yarn may also make the facial details and small ears less defined.
Frequently asked questions
Is this crochet fox keychain beginner-friendly?
Yes. It is suitable for beginners who are comfortable with a magic ring, crocheting in rounds, increases, decreases, and basic assembly. The small parts require patience, but the project is a useful introduction to amigurumi-style construction.
What yarn works best for this pattern?
Smooth cotton, cotton-blend, or acrylic yarn can work well. Cotton usually gives a firm, defined fabric, while acrylic may feel softer and more flexible. Choose a yarn that allows you to see the stitches clearly.
Can I use a different crochet hook size?
Yes, but the finished size and fabric density will change. A smaller hook creates tighter stitches and a firmer piece. A larger hook creates a looser, potentially larger piece and may make the stuffing or inner stitches more visible.
How long does the keychain take to make?
The source pattern does not give an exact completion time. Since it is a small project, the crochet itself may be relatively quick, but shaping, sewing, facial embroidery, and attaching the keychain ring add finishing time.
How can I make the fox larger or smaller?
Change the yarn weight and hook size while maintaining firm tension. Larger yarn and a compatible larger hook usually produce a bigger fox, while thinner yarn and a smaller hook produce a smaller one. The proportions may change, so test the fabric before making every component.
Why is my crochet piece curling?
Curling can result from tight tension, too few increases, or shaping that naturally narrows the piece. Check your stitch count and make sure you are following the increase and decrease sequence consistently. Light reshaping may help, but do not force the fabric flat if the curl is part of the intended shape.
How do I keep the ears and tail securely attached?
Use a strong sewing connection and weave the yarn through several nearby stitches rather than relying on one stitch. Position the parts carefully, then test them with a gentle pull before attaching the keychain ring.
How should I wash the finished keychain?
Follow the yarn-label instructions. When the fiber is unknown, hand wash gently in cool water, avoid harsh rubbing, reshape the fox, and lay it flat to dry.
How much yarn do I need?
The source pattern does not specify yardage. Because the keychain is small, it uses relatively small amounts of each color, but the exact quantity depends on the yarn weight, hook size, tension, and size of the body, head, tail, and flower.
Can I sell finished fox keychains made from this pattern?
The source information does not state the designer’s selling or licensing terms. Check the original pattern designer’s usage policy before selling finished items, and credit the designer if their terms require it.