Adorable Tiny Crochet Frog
This post may contain affiliate links. If you buy through them we may earn a small commission at no extra cost to you. Learn more.
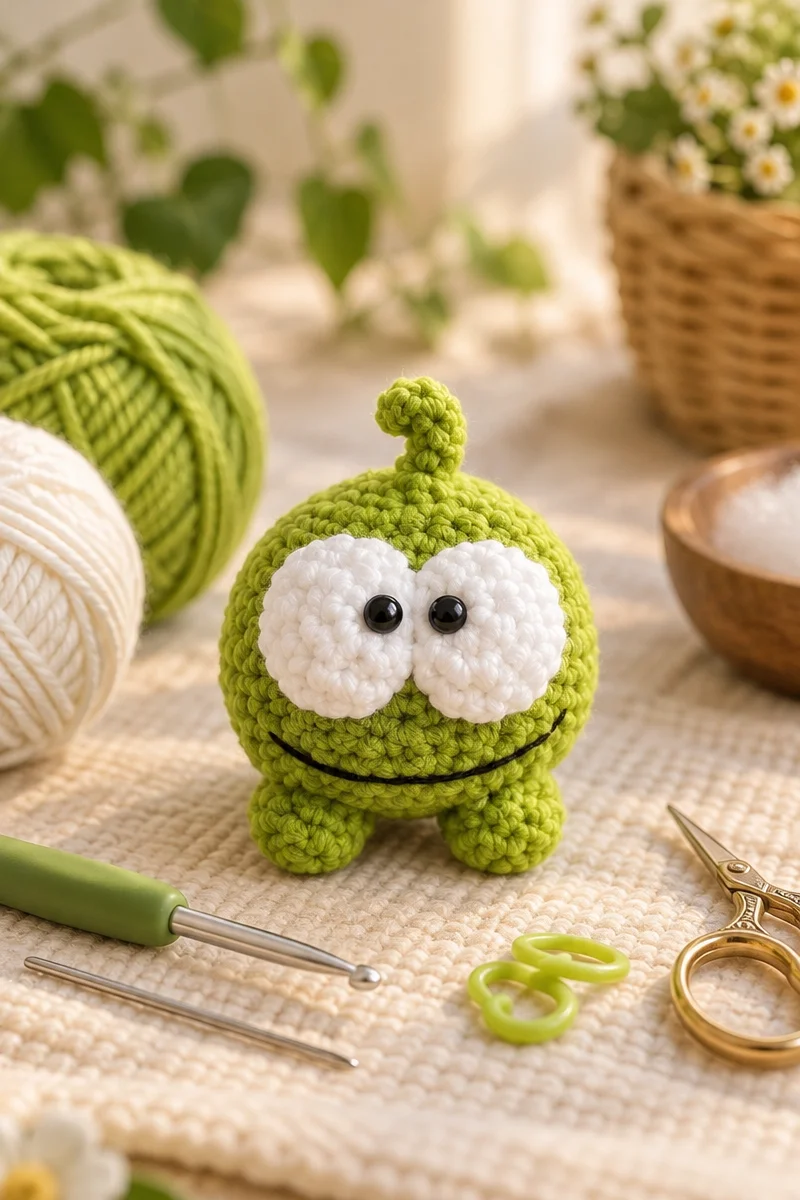
This tiny crochet frog is a charming little amigurumi project with oversized eyes, separate legs, and an adorable curled stem detail. It is a fun choice for beginners who want to practice crocheting in rounds and assembling small pieces without committing to a large project. Make one for a desk, shelf, gift basket, or relaxing portable craft session.
Thank you for reading this post, don't forget to subscribe!Why you’ll love this pattern
This crochet frog has plenty of personality despite its small size. The simple rounded body is approachable for newer crocheters, while the separate legs, eyes, and curled stem provide useful practice with shaping and assembly.
It is also a good scrap-yarn project. Small amounts of yarn can create the body, legs, and details, and changing the colors lets you make a whole group of cheerful frogs. Because the pieces are compact, this project is easy to carry and works well for short crafting sessions.
The finished frog makes a sweet handmade gift, a playful shelf decoration, or a cute addition to a collection of crochet animals.
“The oversized eyes make this little frog unbelievably cute. The pieces were small enough to finish quickly, and attaching the legs gave it so much character.”
How this crochet pattern comes together
You will crochet the frog’s body in continuous or joined rounds, beginning with a magic ring. The body forms the main rounded shape, while the legs, oversized eyes, and curled stem are made separately and attached afterward.
The pattern mainly involves crocheting in rounds and assembling small pieces with a yarn needle. A stitch marker is optional but helpful if you are working in continuous rounds and want to avoid losing track of the beginning of each round.
The project is suitable for beginners who already know basic crochet handling. You should be comfortable making a magic ring, crocheting in rounds, shaping a small piece, and sewing crocheted parts securely. Since the source instructions do not provide stitch counts, yarn weight, or finished measurements, the final size and completion time will depend on your yarn, hook, tension, and the amount of detail you add.
Materials you’ll need
- Yarn
- Crochet hook
- Scissors
- Yarn needle
- Stitch marker, optional
Choose a yarn that produces a firm fabric so the frog’s body and small parts hold their shape. Cotton yarn is a practical option because it has clear stitch definition and is less fuzzy than many synthetic fibers. Acrylic yarn can also work and may create a softer, slightly more flexible frog.
Use a crochet hook suited to your yarn, preferably one slightly smaller than the hook recommended on the yarn label if you need dense stitches for amigurumi. A tight fabric helps prevent stuffing or inner gaps from showing, although the source pattern does not specify a stuffing step.
Green yarn is the traditional choice for a frog, but yellow-green, blue-green, brown, or pastel shades can create a playful variation.
Step-by-step instructions
-
Begin the frog’s body.
Make a magic ring. Crochet the body in rounds, keeping your stitches even as the shape develops. Work carefully around the ring so the center closes neatly. -
Track your rounds.
Place a stitch marker at the beginning of the round if you are crocheting continuously. Move it up after each round. This optional tool makes it easier to identify where one round ends and the next begins. -
Make the legs separately.
Crochet the frog’s legs as individual pieces. Keep both legs similar in size by maintaining the same tension and checking your work as you go. -
Attach the legs.
Position the legs against the lower part of the body. Use the yarn needle to sew them securely in place. Stitch through stable sections of both the legs and body, then check that the frog can sit or rest evenly. -
Crochet the oversized eyes.
Make the eye pieces separately. Their larger size is an important part of the frog’s expressive appearance, so compare both eyes as you work to keep them balanced. -
Secure the eyes to the body.
Place the eyes near the upper portion of the body. Sew them firmly with the yarn needle, making several secure passes through the attachment points. Keep the placement symmetrical unless you want a deliberately quirky expression. -
Form the curled stem.
Crochet the stem-shaped piece and shape it into a curl. Avoid pulling the stitches too tightly, since excessive tension can make the curve difficult to form. -
Attach the stem.
Position the curled stem on the frog’s body and sew it in place. Hold the frog upright while attaching it so you can check that the curl faces the direction you want. -
Weave in loose ends.
Thread each remaining yarn tail onto the yarn needle. Weave the ends securely through the back of nearby stitches, then trim the excess carefully. Do not cut tails before they are anchored, as attached pieces can loosen. -
Add finishing details.
Inspect the frog and add any extra features or details you want. Adjust the eyes, legs, or stem gently until the finished piece has the expression and shape you prefer.
Ways to use your finished project
- Place the frog on a desk, bookshelf, bedside table, or plant shelf.
- Give it as a small handmade gift for a frog lover or crochet enthusiast.
- Add it to a gift basket with gardening, nature, or woodland-themed items.
- Make several frogs in different colors for a playful display.
- Offer finished frogs at a craft fair or in a handmade shop, provided the original designer’s usage terms allow it.
- Use different color combinations to create seasonal or themed decorations.
Because this is a small decorative piece, keep it away from young children and pets if it contains small parts that could become detached.
How to care for your crochet project
Check the yarn label before washing, since care requirements vary between cotton, acrylic, wool, and blended fibers. When the fiber is unknown, gentle hand washing is the safest approach.
- Wash in cool or lukewarm water with a mild detergent.
- Avoid vigorous rubbing, twisting, and wringing.
- Rinse gently and press between clean towels to remove excess water.
- Reshape the frog while damp, paying attention to the legs, eyes, and curled stem.
- Lay it flat to dry away from direct heat and strong sunlight.
- Avoid hanging the frog, since the small sewn parts may stretch the body.
- Store it in a clean, dry place away from moisture and pests.
If the yarn is prone to pilling, handle the frog gently and avoid storing it against rough fabrics.
Helpful crochet tips
- Keep your tension firm but not so tight that the hook becomes difficult to insert.
- Use a stitch marker from the first round if you are unfamiliar with crocheting in continuous rounds.
- Count regularly to catch accidental increases or skipped stitches early.
- Make the two legs and eyes at the same tension so they match in size.
- Pin or hold each piece in place before sewing it permanently.
- Check the frog from the front and side while attaching parts. Placement can look different from each angle.
- Sew the eyes and legs securely because these pieces receive the most handling.
- Weave in ends through several stitches rather than relying on a single pass.
- If the stem does not hold its curl, reshape it gently while damp or adjust its attachment point.
- Avoid overhandling the finished frog while the sewn pieces are still being positioned.
Customize your project
Try one of these realistic variations to give your tiny crochet frog a personal style:
- Change the body color: Use bright green, olive, mint, teal, yellow, or even purple for a whimsical frog.
- Create contrasting eyes: Make the eyes white with dark centers, or use a contrasting color for a cartoon effect.
- Make a frog family: Use a smaller hook and finer yarn for tiny frogs, or a larger hook and thicker yarn for a larger version. Both changes affect the finished size and may alter how much yarn you need.
- Add embroidered details: Small stitched nostrils, a smile, or cheek accents can give the frog more expression.
- Use seasonal colors: Try autumn shades, winter pastels, or bright spring colors for themed displays.
- Coordinate several frogs: Make matching pieces in different colors for party favors, craft-fair displays, or a shelf collection.
- Experiment with texture carefully: Textured yarn can create an interesting surface, but it may hide stitches and make small pieces harder to assemble.
Changing the yarn weight or hook size will change the frog’s proportions, fabric density, and yarn requirements. Test a small section first if maintaining a particular size or firmness matters.
Frequently asked questions
Is this crochet frog beginner-friendly?
Yes. The project uses a magic ring, crocheting in rounds, separate small pieces, and basic sewing. Beginners may need extra practice with the magic ring and attaching parts evenly.
What yarn works best for a tiny crochet frog?
A smooth cotton or acrylic yarn is a good choice because the stitches are easy to see and the fabric can hold its shape. Choose a yarn weight that works comfortably with your hook, keeping in mind that thinner yarn creates a smaller frog and thicker yarn creates a larger one.
Can I use a different crochet hook size?
Yes, but the hook size affects the finished size and fabric density. A larger hook generally creates a larger, looser frog, while a smaller hook creates a smaller, firmer fabric. Use a hook that allows you to crochet neatly without making large gaps.
How long does this project take?
The exact time depends on your experience, yarn thickness, tension, and how much detail you add. Since the frog and its parts are small, it is generally suitable for a short project or several relaxed crafting sessions.
How can I make the frog larger or smaller?
Change the yarn weight and hook size, or adjust the number of rounds only if you understand how the body and attached pieces will be affected. Changing the number of rounds without adjusting the legs, eyes, and stem may make the proportions look uneven.
Why is my crochet body curling?
Small crocheted pieces can curl when tension is tight or when the shape is being worked in rounds. Check that you are following the round structure accurately, avoid pulling the yarn excessively, and gently shape the piece as you work.
How do I keep the eyes and legs even?
Make both pieces with consistent tension and compare them before sewing. Pin or lightly position them on the body first, then view the frog from the front and side before securing them.
How should I wash the finished frog?
Follow the yarn label whenever possible. If the fiber is unknown, hand wash gently in cool water, reshape the frog, and lay it flat to dry.
Can I sell frogs made from this pattern?
The source information does not state whether finished items may be sold. Check the original designer’s usage terms before selling completed frogs, and do not assume that selling rights are included.