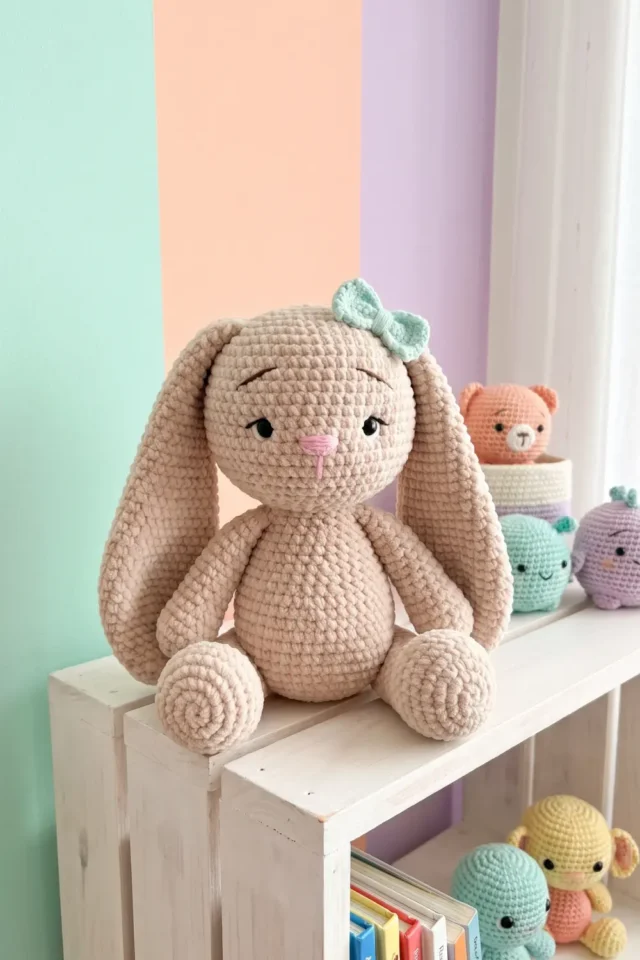
Flopsy Bunny Crochet Toy Pattern
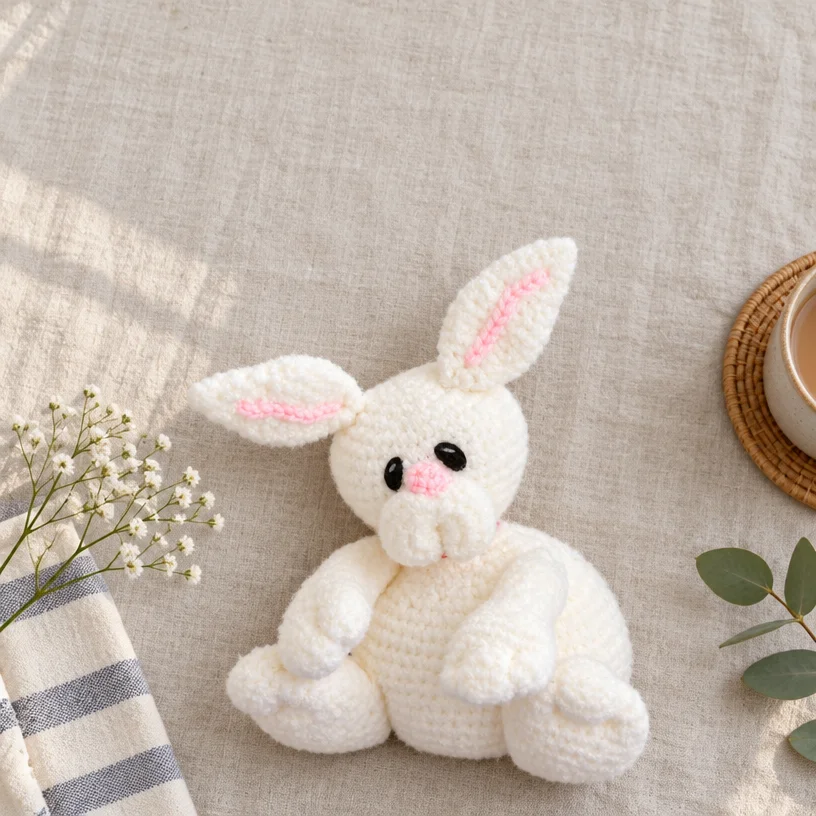
This post may contain affiliate links. If you buy through them we may earn a small commission at no extra cost to you. Learn more.
Engaging with Crochet Flopsy Bunny Toy
Crocheting brings out a wave of joy and creativity, and this adorable Flopsy Bunny Toy pattern is no exception. As a passionate crocheter, I find immense satisfaction in creating soft, cuddly toys that can serve as cherished gifts or delightful decorations. This pattern is especially useful for those looking to make meaningful gifts for little ones or anyone fond of whimsical creations. Not only is this project perfect for honing your crochet skills, but its quick completion time also makes it an enjoyable endeavor for busy crafters.
Why you’ll love this pattern
This crochet project is a favorite among fans for several compelling reasons:
- Beginner-Friendly: The pattern utilizes straightforward stitches, making it accessible for novices.
- Quick Completion: With its relatively simple construction, you can have your bunny ready in no time.
- Handmade Appeal: There’s nothing quite like gifting or displaying a handmade toy, which carries a personal touch.
- Gift Potential: This bunny is an ideal gift for baby showers, birthdays, or just to show someone you care.
- Relaxing and Portable: Crochet is a calming hobby, and this simple pattern allows you to craft while you unwind, making it easy to take along wherever you go.
"I completed the Flopsy Bunny Toy in just a few evenings! The instructions were so clear, and my niece absolutely loved it!" – A satisfied crocheter.
Crochet process explained
In this delightful project, you’ll be crafting a charming Flopsy Bunny toy that consists of a head, body, arms, legs, ears, and a tail. The pattern primarily employs single crochet stitches, allowing you to focus on your technique without overwhelming complexity. While the project is geared towards beginners, it offers enough intricacy to keep more experienced crocheters engaged. On average, you can expect to finish it within a weekend, depending on your pace and available time.
Materials you’ll need
To bring your Flopsy Bunny Toy to life, gather the following materials:
-
Yarn:
- RED HEART® “Moon & Stars™”: 3 balls 3001 Snow A.
- RED HEART® “Super Saver®”: 1 Skein each Pink B and 310 Black C (373 Petal).
-
Crochet Hook: 4mm [US G-6]
-
Notions and Supplies:
- Polyester fiberfill
- Yarn needle
- ½ yard ¾”-wide ribbon
- Pompom maker
Gauge Check: It’s important to check your gauge. Use any size hook to achieve the desired gauge, ensuring that your bunny turns out a perfect size.
Step-by-step instructions
Bunny (Head & Body) (Using color A)
- With A, ch 4; join with a slip stitch into a ring.
- Round 1: Ch 1, 8 sc in ring; join.
- Round 2: Ch 1, 2 sc in each st around; join – 16 sts.
- Round 3: Ch 1, repeat Round 2 – 32 sts.
- Round 4: Ch 1, *sc in next 2 sts, 2 sc in next st; repeat from * around; join – 40 sts.
- Rounds 5-12: Ch 1, sc in each st around; join.
- Round 13: Ch 1, *sc in next 2 sts, skip next st; repeat from * around; join – 32 sts.
- Round 14: Repeat Round 5.
- Round 15: Ch 1, *sc in next 2 sts, skip next st; repeat from * around; join – 24 sts.
- Round 16: Ch 1, *sc in next st, skip next st; repeat from * around; join – 12 sts.
- Stuff head with fiberfill.
- Rounds 17-18: Repeat Round 5.
- Round 19: Ch 1, 2 sc in each st around; join – 24 sts.
- Round 20: Repeat Round 5.
- Round 21: Ch 1, *sc in next 2 sts, 2 sc in next st; repeat from * around; join – 32 sts.
- Round 22: Ch 1, *sc in next st, 2 sc in next st; repeat from * around; join – 48 sts.
- Round 23: Ch 1, *sc in next 2 sts, 2 sc in next st; repeat from * around; join – 64 sts.
- Rounds 24-32: Repeat Round 5.
- Round 33: Ch 1, *sc in next 2 sc, skip next st; repeat from * around; join – 48 sts.
- Round 34: Repeat Round 5.
- Round 35: Ch 1, *sc in next 2 sts, skip next st; repeat from * around; join – 36 sts.
- Round 36: Repeat Round 5.
- Stuff body with fiberfill.
- Round 37: Ch 1, *sc in next st, skip next st; repeat from * around; join – 24 sts.
- Round 38: Repeat Round 37 – 16 sts.
- Round 39: Ch 1, *sc in next 2 sts, skip next st; repeat from * around; join – 12 sts.
- Round 40: Repeat Round 39 – 9 sts.
- Round 41: Ch 1, *sc in next 2 sts, skip next st; repeat from * around; join – 6 sts.
- Round 42: [Slip stitch in next st, skip next st, slip stitch in next st] 2 times; fasten off.
Muzzle (Using color A)
- With A, ch 4; join with a slip stitch into a ring.
- Round 1: Ch 1, 8 sc in ring; join.
- Round 2: Ch 1, 2 sc in each st around; join – 16 sts.
- Round 3: Ch 1, *sc in next st, 2 sc in next st; repeat from * around; join – 24 sts.
- Rounds 4-6: Ch 1, sc in each st around; join.
- Round 7: Ch 1, *sc in next st, skip next st; repeat from * around; join – 16 sts. Fasten off.
- Stuff muzzle with fiberfill.
Nose (Using color B)
- With B, ch 3; join with a slip stitch into a ring.
- Round 1: Ch 1, 6 sc in ring; join.
- Round 2: Ch 1, sc in each st around; join. Fasten off.
- Stuff nose with fiberfill.
Foot (Make 2) (Using color A)
- With A, ch 4; join with a slip stitch into a ring.
- Round 1: Ch 1, 8 sc in ring; join.
- Round 2: Ch 1, 2 sc in each st around; join – 16 sts.
- Round 3: Ch 1, *[2 sc in next st] 2 times; sc in next 6 sts; repeat from * around; join – 20 sts.
- Round 4: Ch 1, *sc in next st, [2 sc in next st] 2 times; sc in next 7 sts; repeat from * around; join – 24 sts.
- Rounds 5-10: Ch 1, sc in each st around; join.
- Round 11: Ch 1, *sc in next 2 sts, skip next st; repeat from * around; join – 18 sts.
- Rounds 12-13: Repeat Round 5.
- Round 14: Ch 1, *sc in next st, skip next st; repeat from * around; join – 12 sts.
- Round 15: Repeat Round 14 – 8 sts.
- Round 16: Ch 1, *sc in next st, skip next st; repeat from * around; join – 4 sts.
- Round 17: Slip stitch in next st, skip next st, slip stitch in next st. Fasten off.
- Stuff foot with fiberfill.
- Toes: With A and yarn needle, sew through the top of the foot and secure 2 times.
Arm (Make 2) (Using color A)
- With A, ch 4; join with a slip stitch into ring.
- Round 1: Ch 1, 8 sc in ring; join.
- Round 2: Ch 1, 2 sc in each st around; join – 16 sts.
- Round 3: Ch 1, *2 sc in next st, sc in next st; repeat from * around; join – 24 sts.
- Rounds 4-7: Ch 1, sc in each st around; join.
- Round 8: Ch 1, *sc in next st, skip next st; repeat from * around; join – 16 sts.
- Round 9: Repeat Round 4.
- Round 10: Ch 1, *sc in next 2 sts, skip next st; repeat from * around; join – 12 sts.
- Rounds 11-16: Repeat Round 4.
- Round 17: Ch 1, *sc in next st, skip next st; repeat from * around; join – 8 sts.
- Round 18: Ch 1, *sc in next st, skip next st; repeat from * around; join – 4 sts.
- Round 19: Ch 1, sc in next st, skip next st, sc in next st, slip st in next st. Fasten off.
- Stuff arm with fiberfill.
- Fingers: With A, sew through the top of the arm and secure 2 times.
Ear (Make 2) (Using color A)
- With A, ch 6; turn.
- Round 1: Sc in 2nd ch from hook and in next 4 ch; rotate Ear to work in unused loops of beginning chain, sc in next 5 ch; join – 10 sts.
- Rounds 2-3: Ch 1, sc in each st around; join.
- Round 4: Ch 1, *2 sc in next st, sc in next st; repeat from * around; join – 15 sts.
- Rounds 5-8: Repeat Round 2.
- Round 9: Ch 1, *sc in next st, skip next st; repeat from * around; join – 10 sts.
- Rounds 10-11: Repeat Round 2.
- Round 12: Ch 1, *sc in next 2 sts, skip next st; repeat from * around; join – 8 sts.
- Round 13: Repeat Round 2.
- Round 14: Ch 1, *sc in next 2 sts, skip next st; repeat from * around; join – 6 sts.
- Round 15: Ch 1, *sc in next 2 sts, skip next st; repeat from * around; join – 4 sts.
- Round 16: Ch 1, sc in next st, skip next st, sc in next st, slip st in next st. Fasten off.
- Stuff ear with fiberfill.
- Inner Ear: With B, embroider the center of ear. Fasten off.
Tail (Using color A)
- With A, make a 1” pompom.
Finishing / Assembly
- Sew arms and feet to the body.
- Secure the tail to the back of the body.
- Attach ears to the top of the head and tack the sides of each ear together at the base.
- Sew the muzzle to the front of the head.
- Run a long stitch from the center of the muzzle to its base and pull tightly; secure and fasten off to form the mouth.
- Attach the nose at the join between the top of the muzzle and the head.
- With C, embroider eyes on the head.
- Weave in all loose ends.
- Tie the ribbon in a bow around the neck and trim the ends.
Creative ideas
Your finished Flopsy Bunny Toy can be used in various delightful ways:
- Playtime Companion: It makes for a perfect gift for babies and children, encouraging imaginative play.
- Home Decor: Display it in a nursery or child’s room for a warm, inviting touch.
- Gifts for Occasions: Perfect for birthdays, baby showers, or any special occasion.
How to care for your crochet project
To maintain your Flopsy Bunny Toy in perfect condition, consider the following care tips:
- Washing: Hand wash in cold water with a gentle detergent.
- Reshape: After washing, reshape while still damp to maintain the toy’s form.
- Drying: Lay flat to dry, avoiding direct sunlight to prevent fading.
- Storage: Store in a cool, dry place away from direct sunlight to keep it looking fresh.
Helpful crochet tips
Here are some practical tips to help you successfully complete your Flopsy Bunny Toy:
- Check Your Gauge: Always check your gauge to ensure your project’s size turns out as desired.
- Count Your Stitches: Keep an eye on your stitch count, especially while joining rounds, to avoid accidental increases or decreases.
- Use Stitch Markers: Utilize stitch markers to help keep track of your rounds, especially as you work on the head and body.
- Keep it Consistent: Maintain even tension throughout your stitches for a neat overall look.
Creative variations
Customize your Flopsy Bunny Toy with these fun ideas:
- Color Variations: Try using different color combinations to suit personal tastes or seasonal themes.
- Decorative Elements: Add personalized embroidery or appliqués to give your bunny a unique character.
- Size Adjustments: Experiment with different yarn weights and hooks to create varying sizes of the bunny.
Frequently asked questions
Is this crochet pattern beginner-friendly?
Yes, this pattern is great for beginners as it mostly uses simple single crochet stitches.
What yarn works best?
The recommended yarn is RED HEART® “Moon & Stars™” for the main body and RED HEART® “Super Saver®” for accents.
Can I use a different hook size?
You may, but changing the hook size can affect the overall size and appearance of your bunny.
How long does the project take?
Depending on your crochet speed, you can typically complete the Flopsy Bunny over a weekend.
How can I make it larger or smaller?
To adjust the size, use a thicker or thinner yarn and an appropriate hook to match.