Granny Square Crochet Blanket Pattern for Beginners
This post may contain affiliate links. If you buy through them we may earn a small commission at no extra cost to you. Learn more.
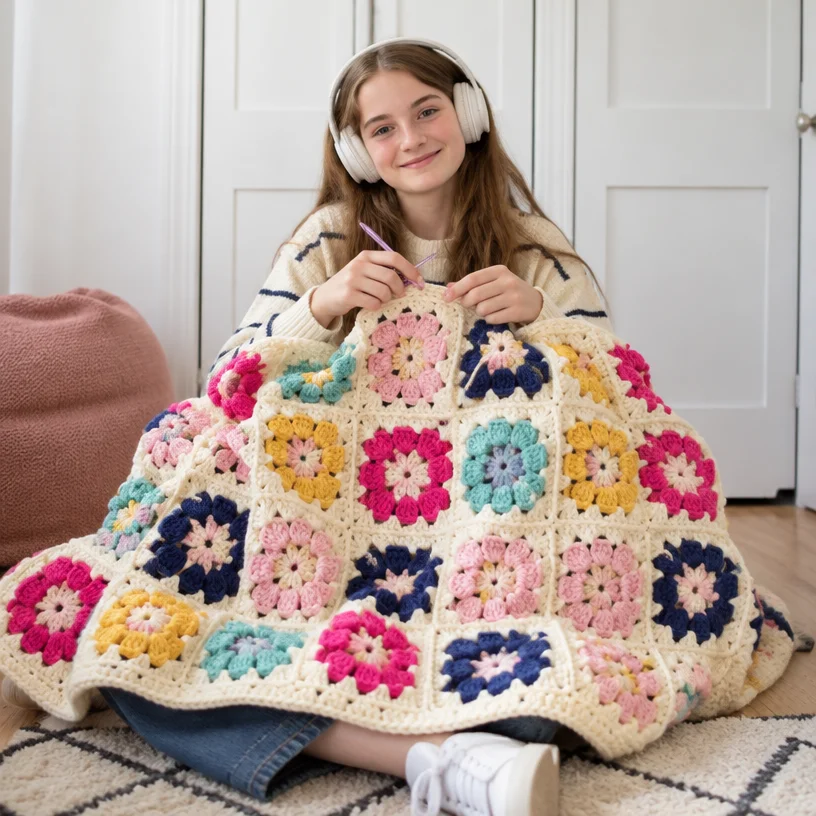
This beginner granny square crochet blanket is a cozy, colorful project made from classic four-round granny motifs. Each square is worked separately, making the blanket easy to carry and ideal for practicing chain stitches, double crochet clusters, color changes, and flat slip-stitch joining. It is a relaxing weekend project for newer crocheters and a satisfying handmade gift for birthdays, housewarmings, baby showers, or cozy movie nights.
Thank you for reading this post, don't forget to subscribe!Why you’ll love this pattern
- Beginner-friendly construction: The motifs use familiar granny-square techniques and repeatable rounds.
- Portable progress: Crochet individual squares anywhere, then assemble the blanket later.
- Excellent practice: You will build confidence with double crochet, chain spaces, joining rounds, color changes, and seaming.
- Bold handmade style: Vintage White provides a soft background while the colorful contrasts add cheerful accents.
- Flexible project options: Choose the small version for a quicker make or the large version for a substantial throw.
- Gift-worthy result: The finished blanket has a classic appearance that works in nurseries, bedrooms, living rooms, and reading corners.
“The motifs were simple enough to crochet while watching television, and the flat slip-stitch join gave the blanket a neat, decorative finish. Keeping the squares organized by color made assembly much easier.”
How this crochet pattern comes together
You will make four-round granny motifs using Bernat Blanket yarns. Each motif begins with a six-chain ring, develops through double crochet clusters and chain spaces, and is finished with a main-color fourth round.
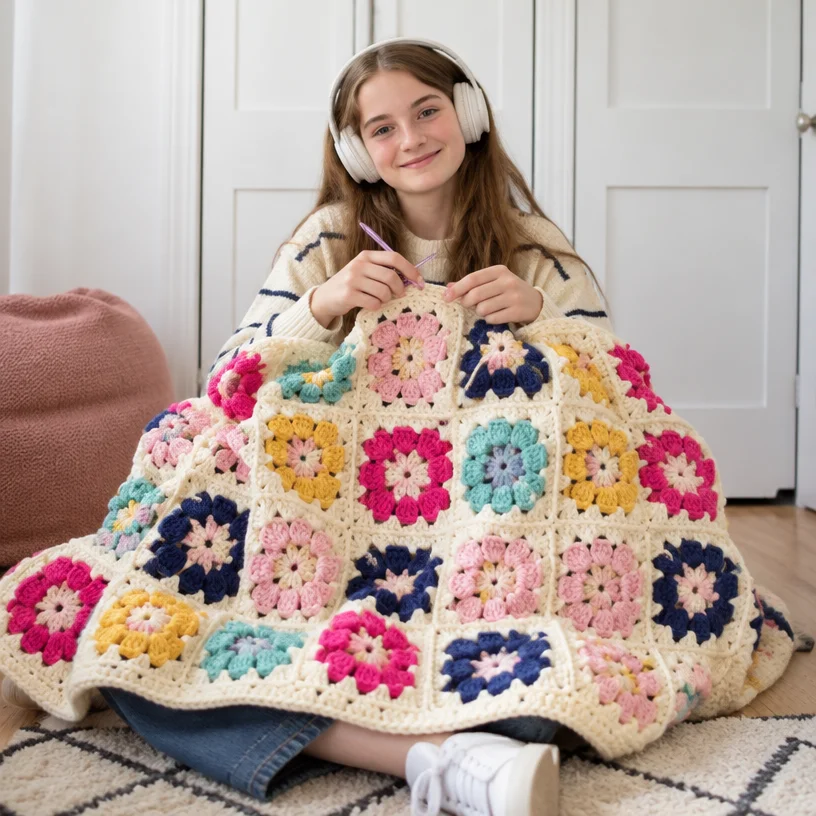
The small blanket uses two contrast colors in a balanced arrangement. The large blanket adds five contrast shades for a more varied color layout. After all motifs are complete, join them into vertical strips and then join the strips together. A single-round single crochet edging finishes the blanket.
The pattern is suitable for confident beginners who understand basic crochet abbreviations. The total time depends on your crochet speed, yarn handling, and whether you choose the small or large version.
Materials you’ll need
Yarn
Both yarns listed below are bulky, plush blanket-style yarns:
- Bernat® Blanket™: 10.5 oz/300 g; 220 yds/201 m per ball
- Bernat® Blanket Brights™: 10.5 oz/300 g; 220 yds/201 m per ball
Small version
- Main Color (MC), Vintage White (10006): 2 balls, or 353 yds/323 m
- Contrast A, Light Teal (10734): 1 ball, or 155 yds/142 m
- Contrast B, Tan Pink (10898): 1 ball, or 155 yds/142 m
Large version
- Main Color (MC), Vintage White (10006): 4 balls, or 694 yds/635 m
- Contrast A, Light Teal (10734): 1 ball, or 58 yds/53 m
- Contrast B, Tan Pink (10898): 1 ball, or 58 yds/53 m
- Contrast C, Gold (10970): 1 ball, or 58 yds/53 m
- Contrast D, Twilight (10905): 1 ball, or 58 yds/53 m
- Contrast E, Bright Pink (12042): 1 ball, or 58 yds/53 m
Tools
- U.S. M/13 (9 mm) Susan Bates® Silvalume® crochet hook, or the size needed to obtain gauge
- Susan Bates® yarn needle
- Tape measure
The pattern uses bulky yarn, which creates large, soft motifs and helps the blanket grow quickly. If you substitute yarn, choose a similar bulky weight. A different yarn may change the motif size, drape, thickness, and total yardage, so make a test motif before committing to the full blanket.
Step-by-step instructions
Abbreviations
- ch: chain
- dc: double crochet
- sl st: slip stitch
- sc: single crochet
- sp: space
- rnd: round
- RS: right side
- MC: Main Color
- rep: repeat
- yoh: yarn over hook
Make a slip knot
- Make a loop with the yarn.
- Fold the loop over itself to create a pretzel shape.
- Pull a section of yarn through the loop to form the slip knot.
- Place the slip knot on your hook and adjust it so it is comfortable but not tight.
Granny motif
Make the required number of motifs according to the color-placement lists below.
Starting ring
- With Color 1, chain 6.
- Join with a slip stitch to the first chain to form a ring.
Round 1
- Chain 6. This counts as 1 double crochet and a chain-3 space.
- Work 3 dc in the ring.
- To make a double crochet, yarn over and draw up a loop in the ring. Yarn over and draw through 2 loops twice.
- Chain 3.
- Repeat the sequence from the asterisk two more times: 3 dc in the ring, ch 3.
- Chain 3.
- Work 2 dc in the ring.
- Join with a slip stitch to the third chain of the beginning chain-6.
- Fasten off.
Round 1 is complete.
Round 2
- Chain 6.
- Work 3 dc in the same space as the joining slip stitch.
- Join Color 2 with a slip stitch in any chain-3 space.
Continue Round 2:
- Chain 1.
- In the next chain-3 space, work (3 dc, ch 3, 3 dc).
- Repeat the previous two steps twice.
- Chain 1.
- Work 2 dc in the first chain-3 space.
- Join with a slip stitch.
- Fasten off.
Round 2 is complete.
Round 3
- Join MC with a slip stitch in any chain-3 space.
- Chain 6.
- Work 3 dc in the same space as the joining slip stitch.
- Chain 1.
- Work 3 dc in the next chain-1 space.
- Chain 1.
- In the next chain-3 corner space, work (3 dc, ch 3, 3 dc).
- Repeat the sequence from Step 4 through Step 7 twice more.
- Chain 1.
- Work 2 dc in the next chain-3 space.
- Join with a slip stitch.
- Do not fasten off.
Round 3 is complete.
Round 4
Continue with MC.
- Slip stitch into the next chain-3 space.
- Chain 6.
- Work 3 dc in the same space as the last slip stitch.
- Chain 1.
- Work 3 dc in the next chain-1 space.
- Chain 1.
- Work 3 dc in the next chain-1 space.
- Chain 1.
- In the next chain-3 corner space, work (3 dc, ch 3, 3 dc).
- Repeat Steps 4 through 9 twice more.
- Work 3 dc in each of the next two chain-1 spaces, placing chain 1 between the groups.
- Chain 1.
- Work 2 dc in the next chain-3 space.
- Join with a slip stitch.
- Fasten off.
Round 4 is complete. Weave in the yarn ends with a yarn needle, securing them carefully through the back of the motif.
Small blanket color placement
Make 8 of each motif combination:
- Color 1 = A and Color 2 = B
- Color 1 = B and Color 2 = A
Large blanket color placement
Make 1 of each:
- Color 1 = A and Color 2 = D
- Color 1 = A and Color 2 = E
- Color 1 = B and Color 2 = A
- Color 1 = B and Color 2 = C
- Color 1 = C and Color 2 = A
- Color 1 = C and Color 2 = E
- Color 1 = D and Color 2 = B
- Color 1 = D and Color 2 = C
- Color 1 = E and Color 2 = B
- Color 1 = E and Color 2 = D
Make 2 of each:
- Color 1 = A and Color 2 = B
- Color 1 = A and Color 2 = C
- Color 1 = B and Color 2 = E
- Color 1 = B and Color 2 = D
- Color 1 = C and Color 2 = B
- Color 1 = C and Color 2 = D
- Color 1 = D and Color 2 = A
- Color 1 = D and Color 2 = E
- Color 1 = E and Color 2 = A
- Color 1 = E and Color 2 = C
Join the motifs with a flat slip-stitch join
- Place the motifs with their right sides facing up.
- Arrange the motifs according to the appropriate assembly diagram or color-placement plan.
- Join MC with a slip stitch in any corner chain-3 space.
- Align the edges of two motifs.
- Working through the back loops only and through both thicknesses, work a slip stitch in each stitch to the next corner chain-3 space.
- Insert the hook through the back loop of the first motif and then through the back loop of the aligned stitch on the second motif.
- Yarn over and complete the slip stitch through both back loops.
- Continue slip stitching through the back loops only until you reach the next corner space.
- Keep the working yarn underneath the work. This creates a flat slip-stitch chain detail on the right side.
- Join the motifs into vertical strips.
- Join the completed strips together to form the blanket.
Keep checking the alignment as you work. Matching the corner spaces and chain-1 spaces helps prevent a stepped or uneven seam.
Edging
Work the first edging round on the right side.
- Join MC with a slip stitch to any corner chain-3 space of the blanket.
- Chain 1.
- Work single crochet evenly around the blanket.
- Work 1 sc in each chain-1 space.
- Work 1 sc in each chain-3 space where motifs meet.
- Work 3 sc in each corner chain-3 space.
- Continue around the entire blanket.
- Join as directed at the beginning of the round.
To make a single crochet, insert the hook in the indicated stitch, yarn over and draw up a loop, then yarn over and draw through both loops on the hook.
Pay close attention to the first double crochet after each chain-3 space so you can identify the top of the stitch correctly.
Ways to use your finished project
- Drape the blanket over a sofa or reading chair for a bright living-room accent.
- Fold it at the foot of a bed for extra warmth and color.
- Give the small version as a handmade housewarming, birthday, or holiday gift.
- Use the large version as a family throw for movie nights and quiet afternoons.
- Coordinate the blanket with cushions or smaller granny-square accessories in the same color palette.
- Photograph the blanket folded or styled on a chair if you plan to feature it in a handmade shop listing.
How to care for your crochet project
Bernat Blanket yarn is a plush synthetic blanket yarn, but always check the care label on your specific skeins before washing.
- Machine wash using the recommended water temperature, usually a gentle cycle.
- Use mild detergent and avoid bleach unless the yarn label specifically permits it.
- Avoid high heat, which can affect the yarn’s texture and cause unnecessary wear.
- Reshape the blanket while it is damp.
- Dry it flat when possible to reduce stretching along the joins.
- Do not hang the blanket while wet, as the weight can pull the motifs out of shape.
- Store it clean and completely dry in a breathable container.
- Avoid compressing it for long periods, which can flatten the plush texture.
- Wash dark or strongly colored sections separately the first time if you are concerned about possible color transfer.
Because the blanket is bulky and heavy, support the full piece when moving it from the washer to the drying area.
Helpful crochet tips
- Keep your tension relaxed. Tight stitches can make the corner spaces difficult to find and may cause the motifs to curl.
- Check every corner. Each corner should have a clearly defined chain-3 space.
- Use removable stitch markers. Mark the beginning of a round or a corner space if you lose track.
- Do not skip chain spaces. The chain-1 spaces between clusters help the motif expand evenly.
- Join rounds carefully. The beginning chain-6 counts as a double crochet and chain-3 space in Round 1.
- Keep motifs consistent. Use the same hook, yarn tension, and finishing method for every square.
- Lay motifs flat before joining. This makes it easier to spot squares that are noticeably larger or smaller.
- Match corners first. When seaming, align the corner chain-3 spaces before working the slip stitches.
- Avoid over-tight joins. A very tight flat slip-stitch seam can pucker the blanket.
- Secure ends well. Weave each tail through several stitches in different directions, especially near corners.
- Measure during assembly. If the strips are not lining up, check for inconsistent motif size before continuing.
- Use the edging to even the border. Work the single crochets evenly rather than forcing too many stitches along a straight edge.
Customize your project
- Change the contrast palette: Replace the listed colors with seasonal combinations such as autumnal golds, winter blues, or soft nursery shades.
- Use one contrast color: Repeating one accent shade creates a calmer, more coordinated look.
- Reverse the color roles: Switching Color 1 and Color 2 changes which color dominates each motif.
- Add a contrast edging: The pattern specifies MC for the edging, but a contrast shade can create a stronger frame.
- Make a coordinating set: Use leftover yarn for cushions, lap blankets, or small granny-square accessories.
- Adjust the blanket size: Make fewer or more motifs, arranging them into a different number of strips. More motifs require additional yarn and more joining.
- Try a different yarn: A lighter yarn produces a thinner, more drapey blanket, while a heavier yarn creates a thicker, heavier result. Always make a test motif first.
- Add surface decoration: Simple embroidery or small appliqués can personalize a finished blanket, but avoid heavy decorations that may affect its drape or washing instructions.
Changing yarn weight or hook size will likely alter the size of each motif, so do not rely on the listed yardage after a major substitution.
Frequently asked questions
Is this granny square blanket suitable for beginners?
Yes. The motifs use basic chains, double crochet clusters, slip stitches, and single crochet. Beginners should work slowly through the first motif and use it as a reference for the remaining squares.
What yarn works best for this blanket?
The specified yarns are Bernat® Blanket™ and Bernat® Blanket Brights™, both listed at 10.5 oz/300 g and 220 yds/201 m per ball. A similar bulky blanket yarn may work, but it can change the size, texture, drape, and yardage requirements.
Can I use a different crochet hook?
Yes, but use the hook size needed to obtain the correct gauge and a comfortable fabric. A smaller hook creates tighter, denser motifs; a larger hook creates looser, more flexible motifs and may increase their size.
How much yarn do I need?
For the small version, you need 2 balls of Vintage White, 1 ball of Light Teal, and 1 ball of Tan Pink. For the large version, you need 4 balls of Vintage White and 1 ball each of Light Teal, Tan Pink, Gold, Twilight, and Bright Pink. The listed yardages are also provided in the materials section.
How can I make the blanket larger or smaller?
Change the number of motifs and arrange them into your preferred number of vertical strips. Adding motifs increases the finished size and yarn requirement, while making fewer motifs creates a smaller blanket.
Why are my granny squares curling?
Slight curling can result from tight tension, skipped chain spaces, or uneven cluster placement. Check that every corner contains the required chain-3 space, loosen your tension, and lay the motifs flat before joining.
How do I keep the blanket edges even?
Make sure each motif is the same size and that the joining seams are not pulled too tightly. During the edging, work single crochet evenly, placing one stitch in each chain-1 space, one stitch in each joining chain-3 space, and three stitches in each corner chain-3 space.
How should I wash the completed blanket?
Follow the care instructions on the yarn labels. Use gentle washing, mild detergent, and low heat or flat drying as recommended. Support the blanket’s weight when it is wet to prevent stretching.
Can I sell blankets made from this pattern?
The supplied pattern information does not state the designer’s rules regarding finished-item sales. Check the original designer’s usage terms before selling blankets made from the pattern, and credit the designer where required.