Three-Color Crochet Blanket Pattern
This post may contain affiliate links. If you buy through them we may earn a small commission at no extra cost to you. Learn more.
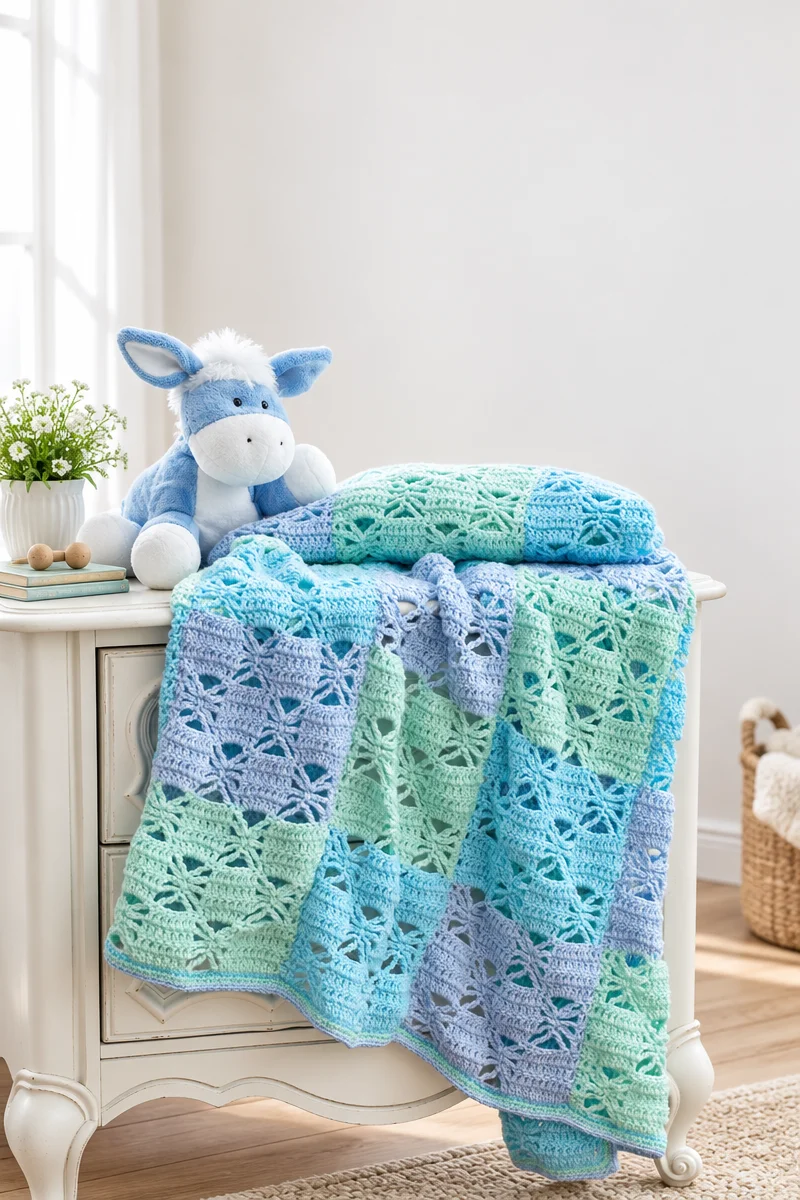
This three-color crochet blanket is built from six coordinated strips joined in sequence, creating a rhythmic geometric design with open chain spaces, V-stitches, and textured treble decreases. The repeated strip construction makes it an enjoyable project for confident beginners and intermediate crocheters, while the soft Bernat Baby Sport yarn makes the finished blanket suitable for a nursery, lap blanket, or thoughtful handmade gift.
Thank you for reading this post, don't forget to subscribe!Why you’ll love this pattern
- The design looks intricate but uses repeating sections. Once the nine-row stitch sequence becomes familiar, the pattern is easy to follow.
- It builds useful crochet skills. You will practice double crochet, single crochet, treble crochet, V-stitches, treble decreases, color changes, sewing strips, and edging.
- The strip construction is portable. Work on one strip at a time instead of managing the full blanket in your lap.
- The color arrangement is built into the pattern. Popsicle Blue, Sweet Grass, and Baby Blue create a soft, baby-friendly palette.
- It makes a practical handmade gift. The finished blanket is well suited to a nursery, baby shower, or cozy home décor.
- The edging gives a neat final frame. Three rounds of single crochet in coordinated colors help stabilize and finish the joined strips.
“The strip construction made this blanket much easier to manage than I expected. I kept one strip in my project bag and loved watching the colors and openwork pattern develop.”
How this crochet blanket comes together
The blanket consists of:
- Strip I: make 2
- Strip II: make 2
- Strip III: make 2
Each strip begins with a chain of 34 and follows the same nine-row stitch pattern. The color order changes from one strip type to the next:
- Strip I begins with color A.
- Strip II begins with color B.
- Strip III begins with color C.
After all six strips are complete, sew them together in this sequence:
I, II, III, I, II, III
The main pattern uses double crochet sections, chain-7 spaces, single crochet anchors, V-stitches, and treble-two-together decreases. These stitches create the repeating geometric texture. The pattern is best suited to a confident beginner or intermediate crocheter because the individual stitches are familiar, but stitch placement and color changes require attention.
The completion time depends on your crochet speed, tension, and how often you work on the blanket. The strip format allows you to make steady progress in shorter sessions.
Materials you’ll need
- Bernat® Baby Sport
- Solids: 350 g / 12.3 oz per ball, or
- Ombres: 280 g / 9.8 oz per ball
- 1 ball of each color:
- #21730 Popsicle Blue — A
- #21718 Sweet Grass — B
- #21128 Baby Blue — C
- 4 mm crochet hook, U.S. G or 6, or the size needed to obtain gauge
- Yarn needle for sewing strips together and weaving in ends
- Scissors
- Measuring tape
- Optional: rustproof pins and a blocking mat
Bernat Baby Sport is a lightweight yarn appropriate for soft blankets and baby projects. If you choose a different yarn, select a similar sport-weight yarn when possible. A different yarn weight or fiber can change the blanket’s size, drape, warmth, and yarn requirements, so make a gauge swatch before committing to the project.
Step-by-step instructions
Abbreviations
- ch: chain
- dc: double crochet
- sc: single crochet
- tr: treble crochet
- RS: right side
- Yoh: yarn over hook
- V-st: V-stitch
- Tr2tog: treble crochet two together
- sl st: slip stitch
- sp: space
- beg: beginning
- rep: repeat
- break: break yarn
- fasten off: cut yarn and pull through the loop to secure
- turn: turn your work
- miss: skip
- draw up a loop: pull up a loop through the indicated stitch or space
For a treble crochet, yarn over twice, insert the hook, draw up a loop, then work the yarn-over-and-draw-through-two-loops step three times.
Make Strip I
Make 2 strips.
Foundation chain
With A, chain 34.
Work Rows 1–9
-
Row 1, right side: Work 1 dc in the 4th ch from the hook.
Repeat the following section twice: work 1 dc in each of the next 7 ch, ch 4, then begin a Tr2tog. To make the Tr2tog, yarn over twice, draw up a loop in the next ch, yarn over and draw through 2 loops twice; miss the next 5 ch; yarn over twice, draw up a loop in the next ch, yarn over and draw through 2 loops twice; yarn over and draw through all 3 loops on the hook. Ch 4. Finish with 1 dc in each of the last 2 ch. Turn. -
Row 2: Ch 3. Work 1 dc in the next dc.
Repeat twice: ch 7, then work 1 dc in each of the next 7 dc. Finish with 1 dc in each of the last 2 dc. Turn. -
Row 3: Ch 3. Work 1 dc in the next dc.
Repeat twice: work 1 dc in each of the next 7 dc, ch 4, then work 1 sc in the top of the Tr2tog two rows below, working over the ch-7 space. Ch 4. Finish with 1 dc in each of the last 2 dc. Turn. -
Row 4: Ch 3. Work 1 dc in the next dc.
Repeat twice: work a V-st in the next sc by making 1 tr, ch 5, and 1 tr in the same sc; then work 1 dc in each of the next 7 dc. Finish with 1 dc in each of the last 2 dc. Turn. -
Row 5: Ch 3. Work 1 dc in the next dc.
Repeat twice: ch 4, make a Tr2tog over the next 7 dc, ch 4, 1 dc in the next tr, 5 dc in the next ch-5 space, and 1 dc in the next tr. Finish with 1 dc in each of the last 2 dc. Turn.To make each Tr2tog, yarn over twice, draw up a loop in the indicated dc, yarn over and draw through 2 loops twice; miss the next 5 dc; yarn over twice, draw up a loop in the next dc, yarn over and draw through 2 loops twice; yarn over and draw through all 3 loops on the hook.
-
Row 6: Ch 3. Work 1 dc in the next dc.
Repeat twice: work 1 dc in each of the next 7 dc, then ch 7. Finish with 1 dc in each of the last 2 dc. Turn. -
Row 7: Ch 3. Work 1 dc in the next dc.
Repeat twice: ch 4, work 1 sc in the top of the Tr2tog two rows below, working over the ch-7 space, ch 4, then work 1 dc in each of the next 7 dc. Finish with 1 dc in each of the last 2 dc. Turn. -
Row 8: Ch 3. Work 1 dc in the next dc.
Repeat twice: work 1 dc in each of the next 7 dc, then work a V-st in the next sc. Finish with 1 dc in each of the last 2 dc. Turn. -
Row 9: Ch 3. Work 1 dc in the next dc.
Repeat twice: work 1 dc in the next tr, 5 dc in the next ch-5 space, 1 dc in the next tr, ch 4, make a Tr2tog over the next 7 dc, and ch 4. Finish with 1 dc in each of the last 2 dc. Turn.
Color sequence for Strip I
Follow the exact repeat sequence below:
- Repeat Rows 2–4. Break A.
- With B, repeat Rows 5–9, then Rows 2–8. Break B.
- With C, repeat Row 9, then Rows 2–9, then Rows 2–4. Break C.
- With A, repeat Rows 5–9, then Rows 2–8. Break A.
- With B, repeat Row 9, then Rows 2–9, then Rows 2–4. Break B.
- With C, repeat Rows 5–9, then Rows 2–8. Break C.
- Join A.
- With A, repeat Row 9.
- Repeat the section from the second row through the ninth row once more. Fasten off at the end of the final row.
Make Strip II
Make 2 strips.
With B, chain 34. Work the pattern as given for Strip I, making these substitutions:
- Use B wherever Strip I says A.
- Use C wherever Strip I says B.
- Use A wherever Strip I says C.
Complete the same row repeats and fasten off at the end.
Make Strip III
Make 2 strips.
With C, chain 34. Work the pattern as given for Strip I, making these substitutions:
- Use C wherever Strip I says A.
- Use A wherever Strip I says B.
- Use B wherever Strip I says C.
Complete the same row repeats and fasten off at the end.
Joining and edging the blanket
Sew the strips together
Arrange the finished strips in this order:
I, II, III, I, II, III
Use a yarn needle and matching yarn to sew the long edges together. Match the rows carefully as you work. A mattress stitch or neat whip stitch can be used, but keep the joining tension relaxed so the seams do not pull or ripple.
Weave in the ends securely on the wrong side.
Work the three-round edging
-
First round: Join A with a sl st to any corner of the blanket. Ch 1. Work 1 rnd of sc evenly around the blanket, making 3 sc in each corner. Join B with a sl st to the first sc.
-
Second round: With B, ch 1. Work 1 sc in each sc around, making 3 sc in each corner sc. Join C with a sl st to the first sc.
-
Third round: With C, ch 1. Work 1 sc in each sc around, making 3 sc in each corner sc. Join with a sl st to the first sc. Fasten off.
Ways to use your finished blanket
- Place it over a nursery rocker, crib chair, or changing-area chair.
- Fold it across the end of a bed or sofa for a soft decorative layer.
- Use it as a lightweight lap blanket while reading or relaxing.
- Give it as a baby shower, new-baby, birthday, or housewarming gift.
- Photograph it with coordinating nursery accessories for a handmade shop or craft-fair display.
- Pair it with a matching cushion, baby hat, or small crochet accessory made in the same color palette.
Because this design uses soft, gentle colors, it works especially well in baby rooms and calm, minimalist interiors.
How to care for your crochet project
Care depends on the exact yarn label, so always check the instructions on your Bernat Baby Sport packaging first.
For general maintenance:
- Wash with cool or lukewarm water using a gentle detergent.
- Use a delicate machine cycle only if the yarn label allows it; otherwise, hand wash.
- Avoid bleach and harsh fabric softeners.
- Do not wring the blanket, as twisting can stretch the strip seams.
- Gently press out excess water and reshape the blanket while damp.
- Dry flat on a clean surface, supporting the full weight of the blanket.
- Avoid hanging it wet, which may cause stretching.
- If needed, lightly block the blanket to straighten the strips and smooth the edging.
- Store it clean and completely dry in a breathable container.
- Keep it away from rough surfaces that can cause pilling or snagging.
Before washing the full blanket, test a small hidden area if you are concerned about color transfer between the blue and green shades.
Helpful crochet tips
- Check your tension early. The 4 mm hook is only a guide. Use the hook size needed to obtain the pattern’s gauge.
- Count the seven-dc groups. The repeated sections depend on these groups staying consistent.
- Mark the right side. A removable stitch marker or safety pin helps you identify the front while working long color sequences.
- Watch the chain spaces. The ch-7 spaces are important anchors for later single crochet stitches. Missing one can shift the entire geometric pattern.
- Work the Tr2tog carefully. Keep the partial treble loops loose enough to draw through all 3 loops smoothly, but not so loose that the decrease becomes oversized.
- Use separate bobbins or balls for active colors. This helps prevent tangling during the frequent color changes.
- Break colors only where instructed. The color order is part of the visual design.
- Keep joins relaxed. Tight strip seams can make the blanket pucker.
- Lay strips flat before sewing. This makes it easier to match the row edges and identify any accidental increases or decreases.
- Weave in ends before edging if possible. A tidy wrong side makes the blanket more durable and comfortable.
- Block lightly. Blocking can improve the shape, but avoid stretching the open chain spaces too aggressively.
Customize your crochet blanket
Change the color palette
Use a neutral combination such as cream, taupe, and gray, or choose brighter shades for a playful children’s blanket. Keep the A, B, and C labels clear so the strip substitutions remain accurate.
Create a seasonal version
Try warm rust, mustard, and cream for autumn, or red, green, and white for a holiday-inspired design. The color sequence will remain the same, but the finished mood will change significantly.
Adjust the size
To make the blanket wider, make additional sets of Strip I, Strip II, and Strip III, then sew them together in the same repeating sequence. Adding strips changes the width and yarn requirements.
To make a smaller blanket, make fewer strip sets, but preserve the color order so the design remains balanced. Changing the number of rows within a strip may interrupt the planned color transitions and is not recommended unless you are comfortable redesigning the sequence.
Add a different border
The three-round single crochet edging gives a clean finish, but you can add more rounds if you want a wider frame. Extra rounds will increase the finished size and require additional yarn.
Use a different yarn
A similar sport-weight yarn may work well, but changing fiber or weight can affect drape, stitch definition, warmth, and measurements. Heavier yarn may produce a thicker blanket and require a larger hook; lighter yarn may create a smaller, more delicate fabric.
Frequently asked questions
Is this crochet blanket suitable for beginners?
It is suitable for confident beginners who understand basic stitches and can follow repeated row instructions. The stitches are not unusually difficult, but the Tr2tog, V-stitches, chain spaces, and color changes require careful attention.
How much yarn do I need?
The pattern calls for one ball of each listed color: Popsicle Blue, Sweet Grass, and Baby Blue. Use the specified Bernat Baby Sport solids or ombres and check your tension, especially if substituting yarn.
Can I use a different crochet hook?
Yes, but use the hook size needed to obtain the correct gauge. A larger hook may make the fabric looser and larger, while a smaller hook may produce a tighter and smaller blanket.
Can I use another yarn brand?
A comparable sport-weight yarn can be used, but the finished blanket may differ in size, texture, drape, and warmth. Make a gauge swatch and confirm that the yarn provides enough yardage for the complete project.
How do I make the blanket larger?
Make additional groups of the three strip types and join them in the repeating order I, II, III. More strips will increase the width and yarn requirements. You can also add extra edging rounds, which will increase the overall dimensions.
Why are my strip edges uneven?
Uneven edges often come from missing the first or last double crochet, changing tension between chain spaces and solid sections, or accidentally skipping a stitch. Count the edge stitches at the end of every row and keep the turning chain consistent.
Why is my blanket rippling after the strips are joined?
Rippling can result from tight sewing, uneven strip lengths, or different tension between strips. Lay the strips flat before sewing, match the rows carefully, and use relaxed stitches when joining.
How should I wash the finished blanket?
Follow the yarn label first. In general, use cool or lukewarm water, gentle detergent, and a delicate cycle or hand washing. Reshape and dry the blanket flat rather than hanging it wet.
Can I sell blankets made from this pattern?
The instructions provided here do not state the designer’s selling or licensing terms. Check the original pattern source for its policy before selling finished items or using the pattern for commercial purposes.