Argyle-Style C2C Crochet Baby Blanket Pattern
This post may contain affiliate links. If you buy through them we may earn a small commission at no extra cost to you. Learn more.
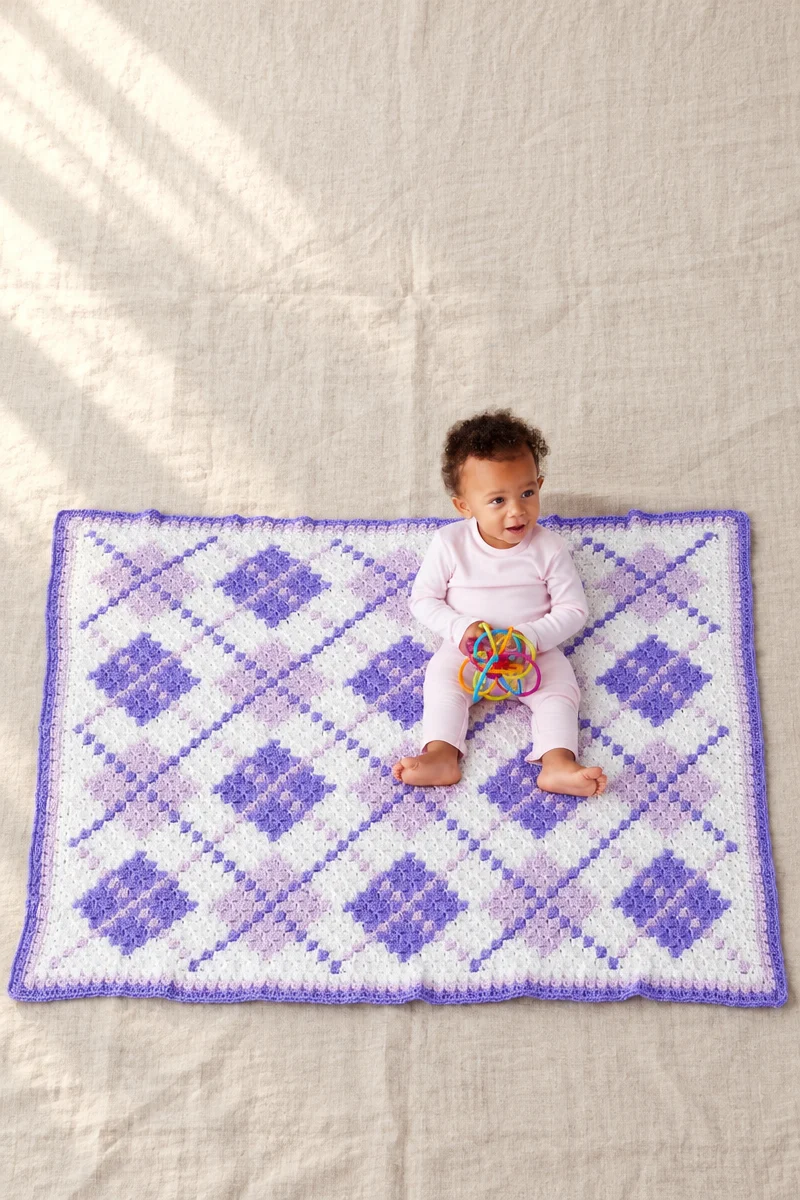
This Argyle C2C crochet baby blanket combines a classic diamond-inspired color layout with the satisfying rhythm of corner-to-corner crochet. The blanket is worked from a chart in small groups of double-crochet stitches, making it an enjoyable project for confident beginners and experienced crocheters alike. It is a thoughtful baby-shower gift, a cozy nursery accent, or a relaxing make for evenings and weekends.
Thank you for reading this post, don't forget to subscribe!Why You’ll Love This Pattern
- Classic argyle-inspired design: The color changes create a neat geometric look without requiring complicated shaping.
- Useful C2C practice: You will work increases, even side sections, decreases, and chart reading in one project.
- Portable construction: C2C crochet is easy to take along once you understand the square repeat.
- Gift-friendly color palette: White, Orchid, and Grape create a soft yet cheerful baby blanket.
- Defined edging: Six rounds of contrasting border stitches give the blanket a finished appearance.
- Beginner skill building: The main stitches are chains, double crochet, and slip stitches.
“The C2C construction was easier to follow than I expected, and the purple border really made the argyle colors stand out. Counting the squares carefully helped me keep the chart on track.”
How This Crochet Pattern Comes Together
This blanket is worked from corner to corner using a chart-based C2C technique. The body begins with Contrast B, Grape, and grows through a series of diagonal rows made from small crochet squares.
Each C2C square consists of a slip stitch into the next chain-3 space, followed by a chain 3 and three double crochet stitches in that same space. The blanket first increases to 49 squares, then works the sides while maintaining the chart count at 49 squares. The chart is completed at row 61 before the blanket decreases back to one final square.
The border is worked after the body is finished. Main Color White is used for the first two rounds, Contrast A Orchid for rounds three and four, and Contrast B Grape for the final two rounds.
The pattern is suitable for crocheters who are comfortable with basic stitches and ready to try chart-based colorwork. Completion time will depend on your crochet speed, tension, and experience with C2C projects.
Materials You’ll Need
Yarn
- Caron® Simply Soft®, 6 oz/170.1 g; 315 yds/288 m per ball
- Main Color (MC) White (9701): 4 balls
- Contrast A Orchid (9717): 2 balls
- Caron® Simply Soft® Brites™, 6 oz/170.1 g; 315 yds/288 m per ball
- Contrast B Grape (B9610): 3 balls
Hook and optional tools
- U.S. I/9 crochet hook, 5.5 mm, or size needed to obtain gauge
- Tapestry needle for weaving in ends
- Scissors
- Pattern chart or printed reference
- Measuring tape for checking the finished shape
Caron Simply Soft is a smooth worsted-weight acrylic yarn with good stitch definition. Use the same yarn weight if substituting, but remember that a different fiber or yarn brand may change the blanket’s size, drape, thickness, and yarn requirements.
Step-by-Step Instructions
Abbreviations
- ch: chain
- dc: double crochet
- sc: single crochet
- sl st: slip stitch
- RS: right side
- rep: repeat
- rem: remaining
In this pattern, one C2C square is made as follows:
Sl st in the next ch-3 sp, ch 3, 3 dc in the same space as the last sl st.
Work the C2C body
-
Begin the foundation.
With Contrast B, Grape, chain 6. Refer to the chart for color placement. -
Work row 1.
Chain 6. Work 1 dc in the 4th chain from the hook, then 1 dc in each of the last 2 chains. Turn.
You now have 1 square. -
Work row 2.
Chain 6. Work 1 dc in the 4th chain from the hook and 1 dc in each of the next 2 chains.
Slip stitch in the next ch-3 space. Chain 3, then work 3 dc in the same ch-3 space as the last slip stitch. Turn.
You now have 2 squares. -
Work row 3.
Chain 6. Work 1 dc in the 4th chain from the hook and 1 dc in each of the next 2 chains.
Repeat the following sequence to the end of the row: slip stitch in the next ch-3 space, chain 3, and work 3 dc in the same space as the last slip stitch. Turn.
You now have 3 squares. -
Complete the initial increase section.
The first three chart rows are complete. Continue following the chart, repeating the last row pattern until the 49th chart row is complete.
This section contains 49 squares.
Work the sides while keeping the chart count
-
Begin the first side row.
Slip stitch in each of the first 3 dc.
Repeat the following sequence to the end of the row: slip stitch in the next ch-3 space, chain 3, and work 3 dc in the same space as the last slip stitch. Turn. -
Work the next side row.
Chain 6. Work 1 dc in the 4th chain from the hook and 1 dc in each of the next 2 chains.
Repeat the following sequence to the last ch-3 space: slip stitch in the next ch-3 space, chain 3, and work 3 dc in the same space as the last slip stitch.
Slip stitch in the last ch-3 space. Turn, leaving the remaining stitches unworked. -
Continue the even side section.
Continue following the chart and repeat the last two rows until the 61st chart row is complete.
This section remains at 49 squares.
Decrease the sides
-
Start the decrease section.
Slip stitch in each of the first 3 dc.
Repeat the following sequence to the last ch-3 space: slip stitch in the next ch-3 space, chain 3, and work 3 dc in the same space as the last slip stitch.
Slip stitch in the last ch-3 space. Turn, leaving the remaining stitches unworked. -
Continue decreasing.
Repeat the last row until only 1 square remains. -
Fasten off.
Fasten off after the body is complete and one square remains.
Add the six-round edging
Work the edging with the right side facing.
-
Round 1: Main Color White.
Join MC with a slip stitch between any 2 squares along an edge.
Chain 1, then work 1 sc in the same space as the joining slip stitch. Chain 3.
Repeat around: work 1 sc between the next 2 squares, then chain 3.
At each corner, work (1 sc, ch 3, 1 sc). Join with a slip stitch to the first sc. -
Round 2: Main Color White.
Slip stitch into the next ch-3 space. Chain 3; this counts as a dc. Work 2 dc in the same space as the last slip stitch.
Repeat around by working 3 dc in each next ch-3 space. At each corner ch-3 space, work (3 dc, ch 1, 3 dc).
Join with a slip stitch to the top of the beginning ch-3. Fasten off. -
Round 3: Contrast A Orchid.
Join A with a slip stitch in the space between 2 groups of 3 dc.
Chain 1, then work 1 sc in the same space as the joining slip stitch.
Repeat around: chain 3, then work 1 sc in the space between the next 2 groups of 3 dc.
At each corner ch-1 space, work (1 sc, ch 3, 1 sc). Join with a slip stitch to the first sc. -
Round 4: Contrast A Orchid.
Work the same as round 2. Fasten off at the end of the round. -
Round 5: Contrast B Grape.
Work the same as round 3 using Contrast B. -
Round 6: Contrast B Grape.
Work the same as round 4 using Contrast B. Fasten off at the end of the round. -
Finish the blanket.
Weave in all yarn tails securely on the wrong side. The specified fastening-off points are:- End of round 2
- End of round 4
- End of round 6
Ways to Use Your Finished Blanket
- Give it as a baby-shower or new-baby gift.
- Use it as a decorative layer in a nursery crib or rocking chair, following safe sleep guidelines.
- Fold it over the back of a nursery chair or sofa for a pop of color.
- Use it as a stroller or car-seat blanket when supervised and appropriate.
- Photograph it with other handmade nursery accessories for a coordinated gift set.
- List it as a handmade baby blanket at a craft fair or online shop, after checking the original pattern’s usage terms.
How to Care for Your Crochet Project
Caron Simply Soft is acrylic yarn, but always check the care label on your specific balls before washing.
- Wash gently using cool or lukewarm water.
- If machine washing is permitted on the label, use a gentle cycle and place the blanket in a laundry bag or pillowcase.
- Avoid hot water, high heat, and aggressive agitation, which can encourage stretching, fuzzing, or color bleeding.
- Reshape the blanket while damp and dry it flat.
- Do not hang the wet blanket, as its weight may stretch the C2C squares and edging.
- If needed, lightly block the blanket by pinning it to its intended shape while damp.
- Store it clean and completely dry in a breathable container.
- Keep it away from direct sunlight for long periods to help preserve the white and purple shades.
Helpful Crochet Tips
- Keep the tension consistent. Tight or loose C2C squares can make the argyle chart look uneven.
- Count squares, not only stitches. At the end of each row, confirm the required number of C2C squares.
- Mark chart rows. Use a sticky note or pencil to track your position on the chart.
- Identify the first square clearly. The starting chain and first double crochet form the foundation block; losing track of the working direction can shift the design.
- Do not add an extra square accidentally. During the side and decrease sections, follow the instructions about leaving stitches unworked.
- Check the ch-3 spaces. Each new square should be anchored in the correct space from the previous square.
- Keep corner spaces open in the edging. The corner increases prevent the border from pulling or curling.
- Fasten off at the stated rounds. Changing colors at the wrong point may disrupt the clean border stripes.
- Secure the ends well. Weave each tail through several nearby stitches, changing direction before trimming.
- Block only after weaving in most ends. A gentle final shaping helps the squares and border settle evenly.
Customize Your Project
- Change the color palette. Replace Grape and Orchid with soft pink, blue, sage, yellow, or neutral shades while keeping White as the main color.
- Use a different main color. Cream, light gray, or pale lavender can create a softer background.
- Create a seasonal version. Try red and green for a holiday blanket, or orange, rust, and cream for an autumn-inspired palette.
- Coordinate the border with the body. Use one contrast shade for all six rounds if you prefer a simpler finish.
- Adjust the size through the chart. A smaller version can stop before reaching the full chart, while a larger version requires extending the charted repeat. Changing the dimensions will also change yarn usage and may alter the border proportions.
- Add a simple applique. A small heart, star, or initial can personalize the blanket, but attach it securely and avoid loose embellishments on items intended for babies.
- Try a coordinating set. Make matching burp cloths, a small lovey, or nursery cushion using the same color palette and edging style.
Changing yarn weight or hook size will affect the finished size, fabric density, drape, and amount of yarn required. Always make a gauge swatch if the final dimensions matter.
Frequently Asked Questions
Is this C2C baby blanket beginner-friendly?
It is suitable for a confident beginner who knows chain, double crochet, single crochet, and slip stitch. The main challenge is following the chart and counting squares during the increase, even, and decrease sections.
What yarn works best for this blanket?
The specified yarn is Caron Simply Soft and Caron Simply Soft Brites, both in the listed quantities and colors. A smooth worsted-weight yarn with clear stitch definition can work as a substitute, but it may change the finished size and texture.
Can I use a different crochet hook?
Yes. Use the hook size that allows you to obtain the intended gauge. A larger hook usually creates a looser, drapier fabric, while a smaller hook creates a denser fabric and may make the blanket smaller.
How much yarn do I need?
You need 4 balls of White, 2 balls of Orchid, and 3 balls of Grape. The Grape yarn is Caron Simply Soft Brites, while White and Orchid are Caron Simply Soft.
How do I keep the C2C edges even?
Count the squares at the end of each row and follow the chart carefully. During the side section, make sure you leave the specified stitches unworked rather than adding another square.
Why is my blanket curling?
Minor curling can result from tight tension, uneven square construction, or a border that has not been blocked. Check your tension, avoid pulling slip stitches too tightly, and gently reshape the finished blanket while damp.
Can I make the blanket larger or smaller?
You can adjust the charted section, but doing so changes the finished dimensions and yarn requirements. A larger blanket will need more yarn, and the argyle design may require careful chart planning to remain balanced.
How should I wash the finished blanket?
Follow the yarn-label instructions. In general, use cool or lukewarm water, gentle handling, and flat drying. Avoid hanging the wet blanket or using high heat.
Can I sell blankets made from this pattern?
The provided instructions do not state the designer’s policy regarding finished items. Check the original pattern source and its usage terms before selling finished blankets or using the pattern for commercial products.