Around-the-Block-Inspired Crochet Baby Blanket Pattern
This post may contain affiliate links. If you buy through them we may earn a small commission at no extra cost to you. Learn more.
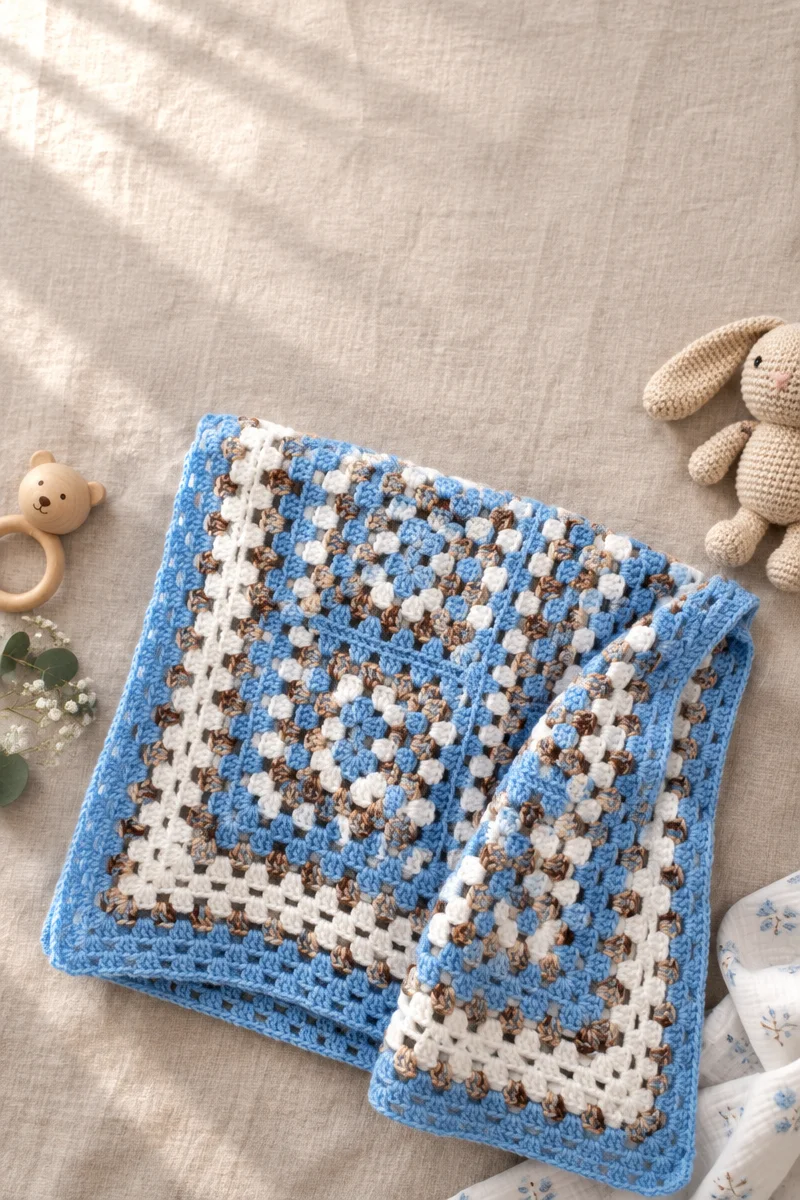
Around the Block Crochet Baby Blanket is a charming project made from nine colorful crochet rectangles. Each rectangle begins with a small oval-shaped foundation and grows through simple rounds of double crochet clusters and chain spaces. The modular construction makes the blanket easy to manage, while the soft blue, white, and earthy blue palette gives it a timeless nursery look.
Thank you for reading this post, don't forget to subscribe!Why you’ll love this pattern
This baby blanket is a wonderful choice for crocheters who enjoy repeating motifs and organized assembly. The individual rectangles are portable, so you can work on them anywhere before joining them into strips.
You will practice several useful techniques, including:
- Double crochet clusters
- Working around both sides of a foundation chain
- Building corners with increases
- Joining rounds with slip stitches
- Sewing crochet pieces together
- Adding coordinated borders
The pattern is also practical for gifting. The soft colors suit a baby boy’s nursery, a gender-neutral room, or a cozy stroller blanket. Because the blanket is made in separate pieces, it is easier to pause between sections than with one large project.
“I loved making the rectangles one at a time. The color changes kept the pattern interesting, and sewing the strips together made the final blanket come together faster than I expected.”
How this crochet pattern comes together
You will crochet nine matching rectangles. Each rectangle uses four rounds:
- A foundation round in Baby Blue
- Round 1 in White
- Round 2 in Blue Earth
- Round 3 in Baby Blue
The rectangles are sewn together in groups of three to create three strips. Each strip receives a three-round border, worked in Blue Earth, White, and Baby Blue. The strips are then joined along their long edges.
Finally, the assembled blanket receives a nine-round border:
- Round 1: Baby Blue
- Round 2: Blue Earth
- Rounds 3–5: White
- Round 6: Blue Earth
- Rounds 7–9: Baby Blue
The main stitch pattern uses double crochet groups separated by chain-2 spaces. The corners are formed with groups of three double crochets, a chain, and three more double crochets. This is a confident beginner pattern, especially for crocheters who are comfortable reading repeated instructions and joining motifs.
Materials you’ll need
- Red Heart® Soft Baby Steps® yarn: 2 balls each of:
- 9800 Baby Blue, color A
- 9600 White, color B
- 9935 Blue Earth, color C
- Crochet hook: 5.5 mm [US I-9]
- Yarn needle
The pattern is written for the specified yarn and hook combination. Using a different yarn weight can change the size, drape, and amount of yarn required. A different hook size may also make the rectangles difficult to join evenly.
You may find a pair of scissors, a few stitch markers, and a measuring tape useful, although they are not listed in the original materials.
Step-by-step instructions
Abbreviations
- ch: chain
- dc: double crochet
- sl st: slip stitch
Make 9 rectangles.
Rectangle foundation round
Work with color A, Baby Blue.
- Chain 12.
- Work 2 dc, then [ch 2, 3 dc] twice, all in the fourth chain from the hook.
- Ch 2, skip the next 2 chains, and work 1 dc in each of the next 3 chains.
- Ch 2, skip the next 2 chains.
- Work 3 dc, [ch 2, 3 dc] twice, all in the last chain.
- Turn the work so you can crochet along the opposite side of the foundation chain.
- Ch 2, skip the next 2 chains, and work 1 dc in each of the next 3 chains.
- Ch 2, skip the next 2 chains.
- Join with a slip stitch to the top of the beginning ch-3.
- Fasten off.
The two ends of the foundation chain form the rounded corners of the rectangle. Keep the chain spaces open and avoid working into the foundation chain too tightly.
Rectangle Round 1
Join color B, White, in the last ch-2 space made.
- Ch 3.
- Work 2 dc in the same ch-2 space.
- Work [ch 2, 3 dc, ch 2, 3 dc in the next ch-2 space] twice. This forms two corners.
- Work [ch 2, 3 dc in the next ch-2 space] twice.
- Repeat the previous sequence around the rectangle as written in the original pattern.
- Ch 2, then work 3 dc in the next ch-2 space.
- Ch 2.
- Join with a slip stitch to the top of the beginning ch-3.
- Fasten off.
Rectangle Round 2
Join color C, Blue Earth, in the ch-2 space before the next corner.
- Ch 3, then work 2 dc in the same ch-2 space.
- Ch 2.
- Work (3 dc, ch 2, 3 dc) in the next ch-2 space to form a corner.
- Ch 2, then work 3 dc in the next ch-2 space.
- Ch 2, then work (3 dc, ch 2, 3 dc) in the next ch-2 space to form the next corner.
- Work [ch 2, 3 dc in the next ch-2 space] 3 times, ch 2.
- Repeat the corner and side sequence around the rectangle.
- Work [ch 2, 3 dc in the next ch-2 space] twice, then ch 2.
- Join with a slip stitch.
- Fasten off.
Rectangle Round 3
Join color A, Baby Blue, in the ch-2 space before the next corner.
- Ch 3, then work 2 dc in the same ch-2 space.
- Ch 2.
- Work (3 dc, ch 2, 3 dc) in the next ch-2 space to form a corner.
- Work [ch 2, 3 dc in the next ch-2 space] twice.
- Ch 2, then work (3 dc, ch 2, 3 dc) in the next ch-2 space to form the next corner.
- Work [ch 2, 3 dc in the next ch-2 space] 4 times.
- Repeat the corner and side sequence around the rectangle.
- Ch 2.
- Work [3 dc in the next ch-2 space, ch 2] 3 times.
- Join with a slip stitch.
- Fasten off.
Repeat the foundation round and Rounds 1–3 until you have nine rectangles.
Form the strips
Arrange three rectangles in a row.
- Place the rectangles with their wrong sides facing you.
- Sew the short ends together.
- Catch the back loops only when sewing.
- Join all three rectangles to form one strip.
- Make two more strips in the same way.
Before sewing, lay the pieces flat and check that the corner spaces and color bands line up. This simple check can prevent a strip from being joined upside down.
Add the strip borders
Work with the right side facing.
Strip Border Round 1
Use color C, Blue Earth.
- Join the yarn in any corner space.
- Ch 3, then work 2 dc in the same corner space.
- Work ch 2, 3 dc in the next ch-2 space.
- Repeat this sequence to the next corner.
- Ch 2.
- Work (3 dc, ch 3, 3 dc) in the corner space.
- Continue repeating the side sequence around the strip.
- Finish with 3 dc in the same corner space as the joining point, then ch 2.
- Join with a slip stitch.
- Fasten off.
Strip Border Round 2
Repeat Strip Border Round 1 with color B, White.
Strip Border Round 3
Repeat Strip Border Round 1 with color A, Baby Blue.
Work the same three-round border around each of the three strips.
Assemble the blanket center
- Arrange the three bordered strips with their right sides facing up.
- Match the long edges.
- Sew the long edges together from the wrong side.
- Check that the motifs and border colors align before completing each seam.
- Fasten off and secure the yarn ends as you go, or leave them for finishing.
Work the blanket border
Work around the entire assembled blanket.
- Round 1: Repeat Strip Border Round 1 with color A, Baby Blue.
- Round 2: Repeat Strip Border Round 1 with color C, Blue Earth.
- Rounds 3, 4, and 5: Repeat Strip Border Round 1 with color B, White.
- Round 6: Repeat Strip Border Round 1 with color C, Blue Earth.
- Rounds 7, 8, and 9: Repeat Strip Border Round 1 with color A, Baby Blue.
- Fasten off.
- Weave in all remaining ends with the yarn needle.
Take care not to pull the border too tightly. A relaxed tension helps the blanket lie flat and keeps the corners from curling.
Ways to use your finished project
This blanket makes a thoughtful handmade gift for:
- A baby shower
- A newborn celebration
- A christening or naming ceremony
- A nursery makeover
- A first birthday
It can be folded over the back of a nursery chair, draped across the end of a crib for display, or used as a soft play mat under supervision. It also works well as a lightweight stroller or car-seat blanket.
For safety, never leave a loose blanket, yarn, or decorative attachment with an unattended sleeping infant. Use it according to current safe-sleep guidance.
How to care for your crochet project
Follow the care instructions on the Red Heart® Soft Baby Steps® yarn label. For a baby blanket, gentle handling is especially important.
- Wash using the recommended water temperature.
- Use a mild detergent.
- Avoid bleach unless the yarn label specifically permits it.
- Choose a gentle machine cycle or hand wash, as directed.
- Do not wring or twist the blanket.
- Support the wet blanket when moving it.
- Reshape it gently and dry it flat if recommended.
- Keep it away from direct high heat, which may affect the fibers and dimensions.
- Store it completely dry in a breathable container or drawer.
If the blanket becomes uneven after washing, gently smooth the edges and corners while damp. Avoid stretching it aggressively, as this can distort the sewn seams.
Tips for success
- Use a stitch marker at the beginning of each round. This makes the joining point easier to find.
- Keep the chain spaces open. The 3-dc groups are worked into these spaces, not usually into individual stitches.
- Count the corners. Each rectangle should have four clear corner spaces after every completed round.
- Keep your tension consistent. Uneven tension can make the nine rectangles different sizes.
- Make one rectangle first. Use it as a size and shape guide for the remaining eight.
- Join colors neatly. Fasten off each round as instructed and weave in ends securely.
- Avoid tight seams. When sewing rectangles and strips together, use a relaxed stitch so the blanket can drape naturally.
- Lay out all pieces before assembly. This helps you catch reversed rectangles or misplaced color sequences.
- Block only if needed. Light blocking can even out the rectangles, but avoid stretching them beyond their natural shape.
- Check the blanket after each border round. If it begins to ripple, your tension may be too loose; if it cups, the stitches may be too tight.
Customize your project
The color arrangement can be changed without altering the basic construction.
Try these ideas:
- Use soft pink, cream, and taupe for a warm nursery palette.
- Replace the blue shades with sage, ivory, and gray for a neutral blanket.
- Make every rectangle in a different color for a cheerful patchwork effect.
- Use a contrasting color for the strip borders.
- Work the final blanket border in one solid shade for a framed appearance.
- Add a simple embroidered initial to one rectangle before assembly.
- Choose seasonal colors, such as rust, mustard, and cream for autumn.
- Make additional rectangles for a larger blanket.
Adding rectangles or extra border rounds will increase the finished size and yarn requirement. Changing the yarn weight or hook size will also affect the dimensions, drape, and amount of yarn needed. Textured or novelty yarns may make the corner spaces harder to identify, so smooth yarn is usually the easiest choice for this design.
Frequently asked questions
Is this crochet baby blanket beginner-friendly?
Yes. The pattern uses repeated double crochet groups, chain spaces, corner increases, and simple seaming. Beginners should be comfortable working in rounds and reading repeated instructions.
How many rectangles are needed?
You need nine rectangles. Sew three rectangles together to make each strip, then join the three strips to form the blanket center.
What yarn works best for this pattern?
The specified yarn is Red Heart® Soft Baby Steps® in Baby Blue, White, and Blue Earth. A smooth yarn with a similar weight can work, but changing yarn may affect the blanket’s size, drape, and yardage.
Can I use a different crochet hook?
You can, but the size may change. A larger hook usually creates a looser, larger fabric, while a smaller hook creates a denser, potentially smaller fabric. Use the specified 5.5 mm [US I-9] hook for the closest match to the pattern.
How can I make the blanket larger?
Make additional rectangles and arrange them into a wider or longer layout. You can also add border rounds, but both changes require more yarn and may alter the proportions.
Why are my rectangles curling?
A small amount of movement is normal, but significant curling usually comes from tight tension, missed chain spaces, or incorrect corner increases. Check that each corner contains the required increase sequence and that the chain spaces remain open.
How do I keep the edges even?
Maintain consistent tension and work the same number of corner increases in every round. Laying the pieces flat after each round can reveal uneven edges before the problem becomes difficult to correct.
How should I wash the finished blanket?
Follow the yarn-label instructions. Use gentle handling, avoid wringing, and reshape the blanket while damp. Dry it as recommended, preferably away from high heat.
Can I sell blankets made from this pattern?
The supplied pattern information does not state the designer’s selling or licensing terms. Check the original designer’s usage policy before selling finished items, and do not redistribute the written pattern or photographs.
How much yarn do I need?
The materials list specifies 2 balls each of Baby Blue, White, and Blue Earth in Red Heart® Soft Baby Steps®. Additional yarn may be needed if you change the size, hook, yarn, or border design.