Crochet Baby Blanket Pattern with Bias Blocks
This post may contain affiliate links. If you buy through them we may earn a small commission at no extra cost to you. Learn more.
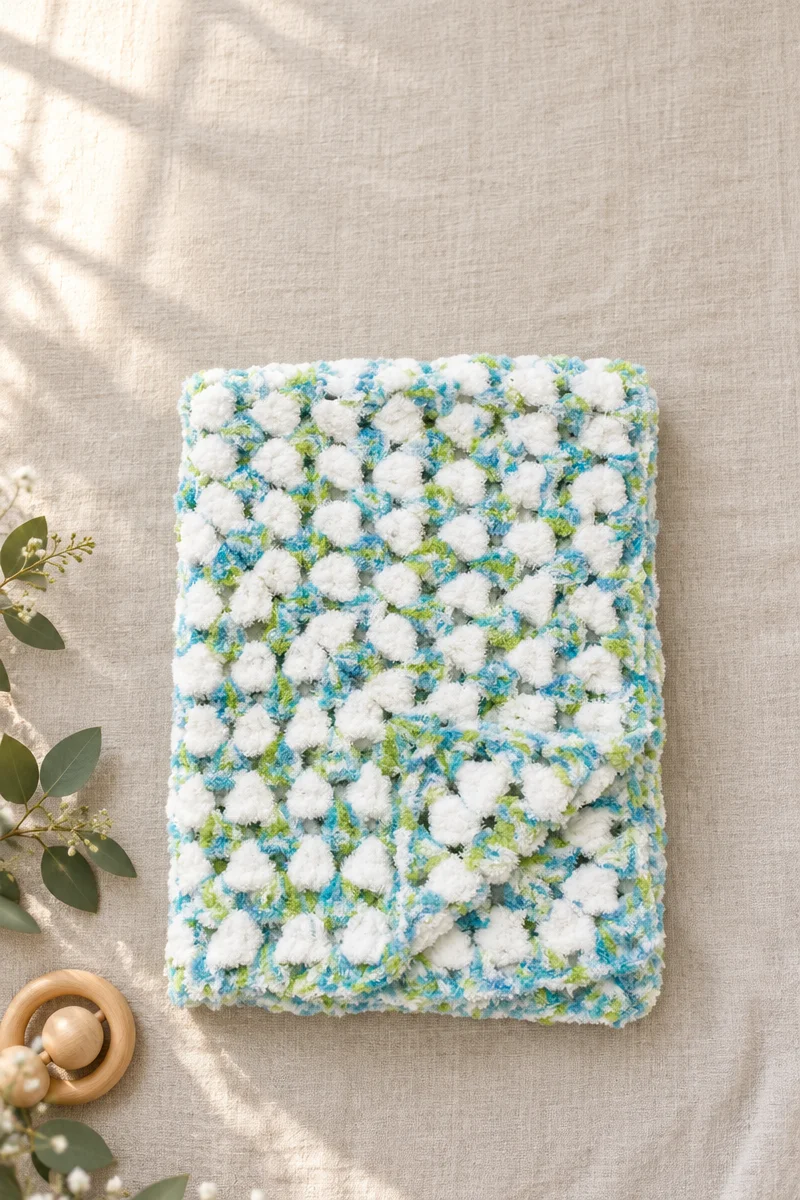
The Bias Blocks Crochet Baby Blanket is a soft, modern project built from simple double crochet blocks arranged on the bias. Its diagonal growth and two-color stripe pattern create plenty of visual interest without complicated shaping. It makes a thoughtful baby shower gift, a cozy nursery accent, or a relaxing handmade project for crocheters who enjoy steady, repeatable rows.
Thank you for reading this post, don't forget to subscribe!Why you’ll love this pattern
- Simple block construction: The blanket uses familiar double crochet blocks and slip stitches, making the technique easy to recognize as you work.
- Excellent skill builder: The pattern teaches bias increases, even side rows, decreases, color changes, and measuring by dimensions.
- Modern striped look: Alternating Contrast A and Contrast B creates clean diagonal color movement.
- Useful handmade gift: The finished blanket is sized for a generous baby blanket or small throw.
- Relaxing repetition: Once the first few rows are established, the repeated blocks create a portable, rhythmic project.
- Soft texture: Bernat® Pipsqueak™ adds a plush, cuddly feel suitable for a baby-focused blanket.
“The block pattern was easy to settle into, and watching the diagonal shape grow made the blanket especially satisfying to crochet. The color changes give it a polished look without requiring complicated stitches.”
How this crochet pattern comes together
This crochet baby blanket begins with one double crochet block made from a six-chain foundation. Each new row increases by one block, creating the bottom diagonal edge. The colors alternate between Contrast A and Contrast B, with one color used per row.
After the side edge reaches 36 inches (91.5 cm), the blanket moves into an even section. Instead of increasing, you work two alternating side rows to extend the longer edge until it measures 40 inches (101.5 cm).
The final section decreases along both sides. Each decrease row removes one block until only one block remains, completing the opposite diagonal edge.
The main technique is the corner-to-corner-style block, formed with:
- A chain-3 space
- Three double crochets
- Slip stitches to connect neighboring blocks
The pattern is suitable for an adventurous beginner who understands basic chains, double crochet, slip stitches, turning, and color changes. The total completion time will depend on your crochet speed, tension, and experience.
Materials you’ll need
- Bernat® Pipsqueak™
- 3.5 oz/100 g; 120 yds/109 m, or
- 8.8 oz/250 g; 300 yds/274 m
- Contrast A: Whitey White (59005) or (58005) — 375 yds/340 m
- Contrast B: Aqua Marine Swirl (59203) or (58203) — 375 yds/340 m
- Crochet hook: U.S. K/10½ (6.5 mm), or the size needed to obtain gauge
You will also find a yarn needle, scissors, and a measuring tape helpful for finishing and checking the blanket dimensions.
Bernat® Pipsqueak™ is a plush yarn with a fuzzy texture. This texture can make individual stitches harder to see, so work slowly during the first rows and feel for the chain-3 spaces as you build the pattern.
If you substitute yarn, choose a similar plush or bulky-feeling yarn only after making a gauge sample. A different fiber, thickness, or texture may change the blanket’s size, drape, warmth, and yardage requirements.
Step-by-step instructions
Abbreviations
- ch: chain
- dc: double crochet
- sl st: slip stitch
- sp: space
- beg: beginning
- rep: repeat
- RS: right side
A block consists of a slip stitch, chain 3, and 3 double crochets worked into the appropriate chain-3 space. A beginning block is made with a chain 6, 1 double crochet in the fourth chain from the hook, and 1 double crochet in each of the next 2 chains.
Start the blanket
- With Contrast A, chain 6.
Work the bias increase section
Row 1 — Right side
- Work 1 double crochet in the fourth chain from the hook.
- Work 1 double crochet in each of the next 2 chains.
- Join Contrast B.
- Turn.
You now have 1 block.
Row 2
- With Contrast B, chain 6.
- Work 1 double crochet in the fourth chain from the hook.
- Work 1 double crochet in each of the next 2 chains. This forms the beginning block.
- In the next chain-3 space, work: slip stitch, chain 3, and 3 double crochets. This forms the next block.
- Join Contrast A.
- Turn.
You now have 2 blocks.
Row 3
- With Contrast A, work a beginning block.
- Work a block in each of the next 2 chain-3 spaces.
- Join Contrast B.
- Turn.
You now have 3 blocks.
Row 4
- With Contrast B, work a beginning block.
- Work a block in each of the next 3 chain-3 spaces.
- Join Contrast A.
- Turn.
You now have 4 blocks.
Row 5
- With Contrast A, work a beginning block.
- Work a block in each of the next 4 chain-3 spaces.
- Join Contrast B.
- Turn.
You now have 5 blocks.
Row 6
- With Contrast B, work a beginning block.
- Work a block in each of the next 5 chain-3 spaces.
- Join Contrast A.
- Turn.
You now have 6 blocks.
Row 7
- With Contrast A, work a beginning block.
- Work a block in each of the next 6 chain-3 spaces.
- Join Contrast B.
- Turn.
You now have 7 blocks.
The last 6 rows form the stripe pattern: 1 row in Contrast A, followed by 1 row in Contrast B.
Continue increasing along the bias
- Continue increasing by 1 block on every row.
- Keep alternating the stripe pattern, working 1 row in Contrast A and 1 row in Contrast B.
- Continue until the side edge measures 36 inches (91.5 cm).
Work the sides evenly
Keep following the stripe pattern while working these two rows.
First side row
- With the right side facing, work a beginning block.
- Work a block in each chain-3 space up to the last chain-3 space.
- Slip stitch in the last chain-3 space. Do not make a block there.
- Turn.
Second side row
- Slip stitch in each of the first 3 double crochets and in the next chain-3 space.
- Work a block in the same chain-3 space as the last slip stitch.
- Work a block in each remaining chain-3 space to the end of the row.
- Turn.
Repeat these last 2 rows while continuing the alternating stripe pattern. Stop when the longer side measures 40 inches (101.5 cm).
Decrease each side to finish
Keep following the alternating stripe pattern.
Decreasing row
- With the right side facing, slip stitch in each of the first 3 double crochets and in the next chain-3 space.
- Work a block in the same chain-3 space as the last slip stitch.
- Work a block in each chain-3 space up to the last chain-3 space.
- Slip stitch in the last chain-3 space. Do not make a block there.
- Turn.
Repeat this decreasing row until only 1 block remains.
Fasten off.
Finishing
Fasten off as written. The source instructions do not include additional assembly, edging, or seaming instructions. Weave in the yarn ends securely with a yarn needle, taking care to hide them within the plush fabric.
Ways to use your finished project
- Give it as a baby shower or new-baby gift.
- Use it as a soft nursery blanket for supervised cuddling.
- Fold it over the back of a rocking chair or nursery chair.
- Place it at the foot of a crib or changing area as a decorative accent.
- Coordinate it with white, aqua, ocean, or pastel nursery décor.
- Photograph it as part of a handmade baby gift set with a hat, lovey, or stuffed toy.
- Offer finished blankets at craft fairs or in a handmade shop, provided you follow the original designer’s usage terms.
Because the yarn has a plush texture, keep the blanket away from loose accessories, ribbons, or small appliqués when it is intended for a baby.
How to care for your crochet project
Always check the yarn label before washing. Bernat® Pipsqueak™ care instructions should take priority over general advice.
- Wash gently using the temperature and cycle recommended on the label.
- Use mild detergent and avoid bleach unless the label specifically permits it.
- Wash dark or strongly colored sections separately the first time if color transfer is a concern.
- Do not wring or twist the blanket, as this can stretch the diagonal shape.
- Press out excess water gently, then reshape the blanket while damp.
- Dry flat on a clean surface.
- Avoid hanging the blanket while wet because its weight may pull the stitches out of shape.
- Do not use high heat unless the yarn label allows it.
- Store the blanket clean and completely dry in a breathable container.
- Fold it loosely instead of compressing it for long periods to help preserve the plush texture.
Blocking may help improve the shape, but use gentle wet reshaping rather than aggressive pinning. Plush yarn can lose its surface texture if handled harshly.
Tips for success
- Make the first blocks carefully. The foundation rows establish the structure for the entire blanket, so check each chain-3 space before moving on.
- Count blocks, not just stitches. During the increase section, the number of blocks should rise by one on every row.
- Use a measuring tape regularly. Yarn thickness and tension can affect the dimensions, so rely on the stated measurements rather than row count alone.
- Keep your tension relaxed. Tight tension can make the blanket stiff and can make it difficult to insert the hook into fuzzy chain-3 spaces.
- Mark the working color. Since the colors alternate every row, a small note or color tracker can help prevent accidentally repeating the same color.
- Join colors neatly. Complete the color change at the end of the row as written, then begin the next row with the new color.
- Do not add a block at the final space of a side or decreasing row. The slip stitch there shapes the edge and prevents an accidental increase.
- Feel for spaces when stitches are difficult to see. With plush yarn, touch can be more reliable than sight.
- Check the edges as you work. If one edge begins to flare or pull inward, pause and count the blocks before continuing.
- Secure the ends well. Plush yarn can conceal ends, but they should still be woven through several nearby stitches.
Customize your project
Change the color palette
Replace the white and aqua combination with pastels, neutrals, or seasonal colors. Keep one main color per row to preserve the clean striped effect.
Make a larger blanket
Continue the bias increase section beyond 36 inches, then work the even section and decreases as usual. Increasing the dimensions will require additional yarn and may create a heavier blanket.
Make a smaller blanket
Stop the increase section before the side edge reaches 36 inches. Work the even section until you reach your preferred length, then begin the decreases. A smaller version will use less yarn, but the proportions may differ unless you measure each section carefully.
Add an edging
The source pattern does not include a border. A simple single crochet edging could frame the blanket, but it may alter the final dimensions and add weight. Test the edging on a small sample first, especially around the diagonal corners.
Create a coordinated set
Use the same color palette for a matching baby hat, burp cloth, security blanket, or cushion cover. Other projects will require their own stitch counts and yarn calculations.
Use a different yarn texture
A smooth yarn will make the blocks easier to see, while a fuzzy yarn will produce a softer, more plush appearance. Changing yarn weight or fiber can affect the gauge, drape, thickness, finished size, and amount of yarn needed.
Frequently asked questions
Is this crochet baby blanket beginner-friendly?
It is suitable for an adventurous beginner who knows how to chain, make double crochet stitches, slip stitch, turn rows, and change colors. The bias increases and decreases require careful attention, but the block pattern is repetitive once established.
What yarn works best for this pattern?
The specified Bernat® Pipsqueak™ is designed to give the blanket a soft, plush texture. If you use another yarn, choose a similar weight and make a gauge sample first. A smooth yarn will show the blocks more clearly, while a fuzzy yarn will feel more cuddly.
Can I use a different hook size?
Yes, but the hook size should be chosen based on the gauge you need. A larger hook may create a looser, drapier fabric and increase the finished size. A smaller hook may make the fabric denser and reduce the finished size.
How much yarn do I need?
The pattern lists 375 yards (340 m) each of Contrast A and Contrast B. The listed Bernat® Pipsqueak™ put-up options are 120 yards (109 m) for 3.5 ounces/100 grams or 300 yards (274 m) for 8.8 ounces/250 grams. Purchase enough skeins to meet the required yardage, allowing extra if your tension is loose or you plan to add an edging.
How do I make the blanket larger or smaller?
Adjust the length of the increase and even sections before beginning the decreases. Measure the side edge during the increase section and the longer side during the even section. Changing the size will also change the yarn requirements and may affect the proportions.
Why is my blanket curling or losing its shape?
A small amount of curling can result from tight tension, uneven blocks, or the plush yarn’s texture. Check that every block contains the correct stitches and that you are not adding an extra block at the row ends. Gentle wet reshaping after finishing may help.
How do I keep the edges even?
Work the beginning block consistently, slip stitch into the correct chain-3 spaces, and avoid making a block in the final space of the specified side and decrease rows. Measuring both edges regularly can reveal problems early.
Can I add a border?
The instructions do not include a border, but you may add one if desired. A border can change the size and drape, so work a sample or use a relaxed tension around the edge.
How should I wash the finished blanket?
Follow the yarn label first. In general, use gentle washing, mild detergent, low or no heat, and flat drying. Avoid wringing or hanging the wet blanket because the weight can stretch the stitches.
Can I sell blankets made from this pattern?
The provided instructions do not state whether finished items may be sold. Check the original designer’s usage terms before listing or selling completed blankets.