Beach-Themed Crochet Blanket Pattern

This post may contain affiliate links. If you buy through them we may earn a small commission at no extra cost to you. Learn more.
This beach crochet blanket brings together soft seafoam and teal stripes with an airy openwork design. The repeating pattern uses single crochet, double crochet, chain spaces, and dropped stitches worked into rows below, creating a relaxed texture that suits a coastal bedroom, living room, porch, or picnic setting. It is a satisfying project for crocheters who know the basic stitches and want to practice color changes and patterned rows.
Thank you for reading this post, don't forget to subscribe!Why you’ll love this pattern
- The seafoam-and-teal palette gives the blanket a fresh beach-inspired look.
- A repeating 16-row sequence makes the design easier to follow once the first repeat is established.
- The open chain spaces keep the fabric lighter than a dense solid blanket.
- The pattern builds useful skills, including working double crochet into a skipped stitch three rows below.
- The blanket is practical for home décor, lounging, gifting, and warm-weather use.
- The simple reverse single crochet border adds a neat, textured finish.
- The work is made in rows, so it is easy to carry and pause between sessions.
“The color combination is beautiful, and the openwork rows give the blanket so much movement. Once I understood where the double crochets went, the repeat became relaxing to crochet.”
How this crochet pattern comes together
You will crochet a rectangular blanket beginning with a foundation chain of 136 stitches. The first two rows create a single crochet base. Rows 3–18 then establish the main lace-like texture with alternating chain spaces, single crochet sections, and double crochet stitches worked into skipped stitches three rows below.
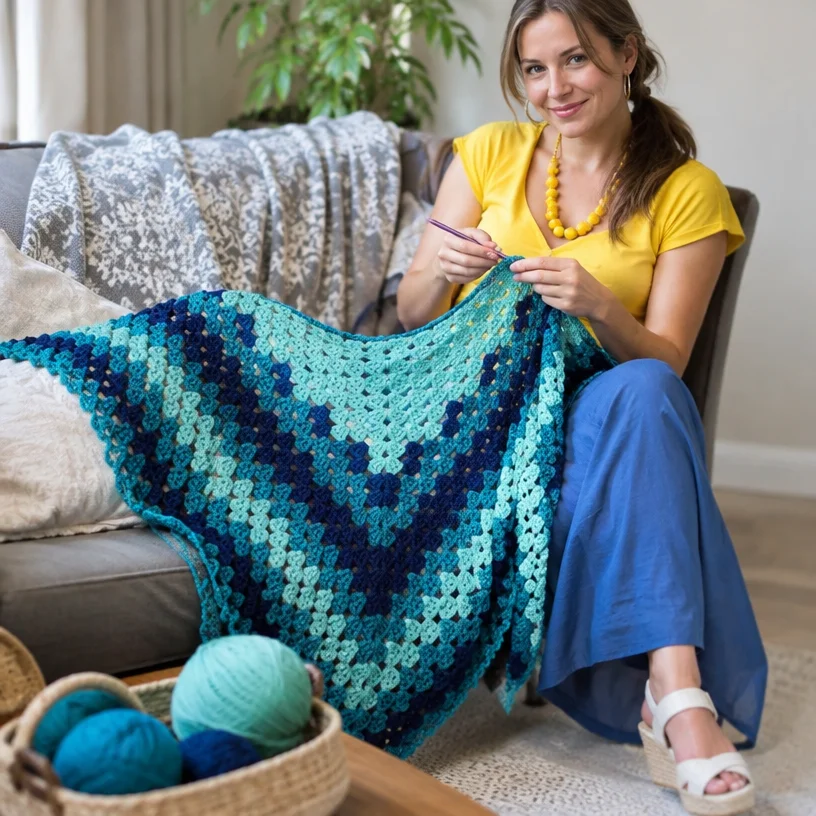
The color changes occur at the ends of selected rows. After the first 18 rows, repeat Rows 3–18 until the blanket measures 60 inches from the beginning. Finish the final repeat with Row 18, add two rounds of edging, and weave in the ends.
This is best suited to an intermediate beginner or confident beginner. The basic stitches are straightforward, but the dropped double crochet placement requires careful counting and attention to the fabric below. Completion time depends on your tension, crochet speed, and how often you work on the blanket.
Materials you’ll need
- Yarn: RED HEART® “Soft Yarn™”
- 6 balls of 9520 Seafoam, Color A
- 6 balls of 9518 Teal, Color B
- Crochet hook: I-9, 5.5 mm
- Yarn needle for weaving in ends
RED HEART® Soft is a smooth yarn that works well for blankets and gives the textured stitches clear definition. Check the yarn label for the current fiber content and laundering instructions.
Keep both colors organized while working. Since the pattern changes color frequently, a yarn bowl or separate project bags can help prevent the strands from tangling.
Pattern instructions
Abbreviations
- ch: chain
- sc: single crochet
- dc: double crochet
- sl st: slip stitch
- st/sts: stitch/stitches
- sp: space
- RS: right side
A “double crochet in the next skipped stitch 3 rows below” means to insert the hook into the skipped stitch located three rows beneath the current row. Work the double crochet around the strands above it without pulling the fabric out of shape.
Main blanket body
-
With Color A, chain 136.
-
Row 1 (RS): Sc in the second chain from the hook and in each remaining chain across. You should have 135 sc.
-
Row 2: Ch 1 and turn. Sc in each sc across. Change to Color B in the last stitch.
-
Row 3: Ch 1 and turn. Sc in the first 3 sc.
Repeat the following sequence across:
Ch 2, skip the next sc, sc in the next sc, ch 2, skip the next sc, sc in the next 3 sc.
You should have 91 sc and 44 ch-2 spaces. -
Row 4: Ch 1 and turn. Sc in the first 3 sc.
Repeat across:
Ch 2, skip the next ch-2 space, sc in the next sc, ch 2, skip the next ch-2 space, sc in the next 3 sc.
Change to Color A in the last sc. -
Row 5: Ch 1 and turn. Sc in the first 2 sc.
Repeat the following sequence:
Ch 2, skip the next sc, dc in the next skipped stitch 3 rows below, sc in the next sc, dc in the next skipped stitch 3 rows below, ch 2, skip the next sc, sc in the next sc.
Repeat to the last sc, then sc in the last sc. You should have 47 sc, 44 dc, and 44 ch-2 spaces. -
Row 6: Ch 1 and turn. Sc in the first 2 sc.
Repeat across:
Ch 2, skip the next ch-2 space, sc in the next 3 sts, ch 2, skip the next ch-2 space, sc in the next sc.
Repeat to the last sc, then sc in the last sc. Change to Color B in the last sc. You should have 91 sc and 44 ch-2 spaces. -
Row 7: Ch 1 and turn. Sc in the first sc.
Repeat the following sequence:
Ch 2, skip the next sc, dc in the next skipped stitch 3 rows below, sc in the next 3 sc, dc in the next skipped stitch 3 rows below.
Repeat to the last 2 sc, then ch 2, skip the next sc, and sc in the last sc. You should have 68 sc, 44 dc, and 23 ch-2 spaces. -
Row 8: Ch 1 and turn. Sc in the first sc.
Repeat across:
Ch 2, skip the next ch-2 space, sc in the next 5 sts.
Repeat to the last ch-2 space, then ch 2, skip the next ch-2 space, and sc in the last sc. Change to Color A in the last sc. You should have 112 sc and 23 ch-2 spaces. -
Row 9: Ch 1 and turn. Sc in the first sc.
Repeat the following sequence:
Dc in the next skipped stitch 3 rows below, sc in the next 2 sc, ch 2, skip the next sc, sc in the next 2 sc.
Repeat to the last ch-2 space, then dc in the next skipped stitch 3 rows below and sc in the last sc. You should have 90 sc, 23 dc, and 22 ch-2 spaces. -
Row 10: Ch 1 and turn. Sc in the first 4 sts.
Repeat across:
Ch 2, skip the next ch-2 space, sc in the next 5 sts.
Repeat to the last ch-2 space, then ch 2, skip the next ch-2 space, and sc in the last 4 sts. Change to Color B in the last sc. You should have 113 sc and 22 ch-2 spaces. -
Row 11: Ch 1 and turn. Sc in the first sc.
Repeat the following sequence:
Ch 2, skip the next sc, sc in the next 2 sc, dc in the next skipped stitch 3 rows below, sc in the next 2 sc.
Repeat to the last 2 sc, then ch 2, skip the next sc, and sc in the last sc. You should have 90 sc, 22 dc, and 23 ch-2 spaces. -
Row 12: Ch 1 and turn. Sc in the first sc.
Repeat across:
Ch 2, skip the next ch-2 space, sc in the next 5 sts.
Repeat to the last ch-2 space, then ch 2, skip the next ch-2 space, and sc in the last sc. Change to Color A in the last sc. You should have 112 sc and 23 ch-2 spaces. -
Row 13: Ch 1 and turn. Sc in the first sc.
Repeat the following sequence:
Dc in the next skipped stitch 3 rows below, ch 2, skip the next sc, sc in the next 3 sc, ch 2, skip the next sc.
Repeat to the last ch-2 space, then dc in the next skipped stitch 3 rows below and sc in the last sc. You should have 68 sc, 23 dc, and 44 ch-2 spaces. -
Row 14: Ch 1 and turn. Sc in the first 2 sts.
Repeat across:
Ch 2, skip the next ch-2 space, sc in the next 3 sc, ch 2, skip the next ch-2 space, sc in the next st.
Repeat to the last sc, then sc in the last sc. Change to Color B in the last stitch. You should have 91 sc and 44 ch-2 spaces. -
Row 15: Ch 1 and turn. Sc in the first 2 sc.
Repeat the following sequence:
Dc in the next skipped stitch 3 rows below, ch 2, skip the next sc, sc in the next sc, ch 2, skip the next sc, dc in the next skipped stitch 3 rows below, sc in the next sc.
Repeat to the last sc, then sc in the last sc. You should have 47 sc, 44 dc, and 44 ch-2 spaces. -
Row 16: Ch 1 and turn. Sc in the first 3 sts.
Repeat across:
Ch 2, skip the next ch-2 space, sc in the next sc, ch 2, skip the next ch-2 space, sc in the next 3 sts.
Change to Color A in the last stitch. You should have 91 sc and 44 ch-2 spaces. -
Row 17: Ch 1 and turn. Sc in the first 3 sc.
Repeat across:
Dc in the next skipped stitch 3 rows below, sc in the next sc, dc in the next skipped stitch 3 rows below, sc in the next 3 sts. -
Row 18: Ch 1 and turn. Sc in each stitch across. Change to Color B in the last stitch. You should have 135 sc.
Repeat the main pattern
Repeat Rows 3–18 until the blanket measures 60 inches from the beginning. End with Row 18, and change to Color A in the last stitch of the final row.
Do not fasten off.
Add the border
-
Round 1 (RS): With Color A, ch 1. Work sc evenly around all edges of the blanket. Work 3 sc in each corner to help the border turn neatly. Join with a sl st in the first sc.
-
Round 2: Ch 1. Work reverse sc in each stitch around. Join with a sl st in the first sc.
-
Fasten off and weave in all ends securely with the yarn needle.
Reverse single crochet, also called crab stitch, is worked in the opposite direction from regular single crochet. Keep the tension relaxed so the border does not pull the blanket inward.
Ways to use your finished project
- Drape the blanket over a sofa or reading chair for a coastal accent.
- Fold it at the end of a bed in a guest room or beach house.
- Use it as a lightweight layer for cool evenings on a porch or patio.
- Give it as a handmade housewarming, wedding, birthday, or beach-themed gift.
- Photograph it as a relaxed home décor piece for a handmade shop listing.
- Pair it with coordinating sea-inspired pillows, baskets, or throws for a complete room display.
How to care for your crochet project
Follow the care instructions printed on the yarn label, especially if the yarn formulation changes. For the safest routine:
- Wash gently in cool or lukewarm water.
- Use a mild detergent.
- Avoid bleach and harsh fabric softeners.
- If machine washing is permitted, place the blanket in a large mesh bag and use a gentle cycle.
- Do not wring or twist the fabric.
- Press out excess water and reshape the blanket while damp.
- Dry flat on a clean surface, supporting the full weight of the blanket.
- Avoid hanging it wet, since the openwork fabric may stretch.
- Keep it away from prolonged direct sunlight to help limit fading.
- Store it clean and completely dry, folded loosely in a breathable container.
If the finished blanket develops mild fuzzing, remove pills carefully with a fabric shaver designed for delicate fabrics.
Tips for success
- Count the foundation chain carefully. Row 1 must finish with 135 sc.
- Mark the right side. The pattern uses right-side instructions and several planned color changes.
- Use stitch markers at the row ends. This makes it easier to identify the first and last stitch.
- Watch the chain spaces. The openwork rows are built by skipping ch-2 spaces, not by treating them as regular stitches.
- Locate the skipped stitch before making each dropped dc. Counting three rows down prevents misplaced vertical stitches.
- Keep your tension even. Tight chain stitches can make the blanket curl, while loose double crochets can create uneven openings.
- Check your stitch count after each special row. The counts included in the pattern are useful checkpoints.
- Change colors in the last stitch as instructed. This keeps the color transition clean at the edge.
- Measure from the beginning periodically. Stop only after the piece reaches 60 inches and the final repeat ends with Row 18.
- Do not fasten off before the border. The instructions continue directly into Round 1.
- Use three sc in every corner. Too few corner stitches may cause the edge to pull; too many can make it ruffle.
- Keep the reverse sc border relaxed. A tight crab-stitch round can distort the blanket’s shape.
Customize your project
- Choose another two-color palette. Navy and cream can create a nautical look, while coral and aqua feel more tropical. Different colors will change the mood but not the stitch structure.
- Use a contrasting border. Keeping the blanket in two colors and working the edging in a third shade can emphasize the texture.
- Make a wider blanket. Add foundation chains only in a way that preserves the pattern’s stitch repeat. A wider starting chain will require more yarn and may change the overall proportions.
- Make a shorter throw. Stop after a complete repeat ending with Row 18. The finished length will depend on your row gauge.
- Try a coordinated yarn set. Make matching cushion covers or a smaller lap blanket with the same colors and stitch texture.
- Add surface embroidery sparingly. Simple wave lines or small motifs can reinforce the beach theme, but heavy embellishment may reduce the blanket’s drape.
- Use a different yarn texture carefully. A thicker or thinner yarn, or a yarn with significant texture, will alter the size, stitch definition, drape, and yarn requirement. Make a swatch first.
Frequently asked questions
Is this beach crochet blanket suitable for beginners?
It is suitable for confident beginners who know single crochet, double crochet, chain spaces, and turning rows. The main challenge is working double crochet stitches into skipped stitches three rows below.
How much yarn does the pattern require?
The pattern calls for 6 balls of RED HEART® Soft in Seafoam and 6 balls in Teal. Actual usage can vary with tension, so keep the yarn labels and purchase information until the blanket is complete.
Can I use a different yarn?
Yes, but choose a yarn with a similar thickness and make a gauge swatch first. A different yarn can change the blanket’s width, length, drape, texture, and total yarn requirement.
Can I use a different crochet hook?
You can, but the hook size affects the fabric. A larger hook usually creates a looser, drapier blanket, while a smaller hook produces denser fabric. Changing the hook may also alter the finished measurements.
How can I make the blanket larger or smaller?
For the width, adjust the foundation chain while preserving the stitch structure and repeat required by the pattern. For the length, work fewer or more complete repeats of Rows 3–18. Any size change affects yarn usage and final dimensions.
Why is my blanket curling?
Curling commonly comes from tight chain stitches, uneven tension, or misplaced stitches. Check that you are working into the correct ch-2 spaces and skipped stitches. Blocking the finished blanket can also help relax minor curling.
How do I keep the edges even?
Place a marker in the first or last stitch of each row, count the stitches regularly, and avoid working into the turning chain unless the instructions specifically say to do so. The row-end stitch counts are useful for correcting mistakes early.
What does “dc in the skipped stitch 3 rows below” mean?
Insert the hook into the stitch that was skipped three rows earlier, yarn over, and complete a regular double crochet. This stitch is worked into the lower stitch rather than the current row, creating the vertical textured detail.
How should I wash the finished blanket?
Follow the yarn-label instructions. In general, use cool or lukewarm water, mild detergent, gentle handling, and flat drying. Do not hang the blanket while wet because the fabric may stretch.
Can I sell blankets made from this pattern?
The supplied pattern information does not state its licensing or finished-item policy. Check the original designer or publisher’s usage terms before selling finished blankets or using the pattern for commercial listings.