Crochet Blanket Pattern: Because I Knew You
This post may contain affiliate links. If you buy through them we may earn a small commission at no extra cost to you. Learn more.
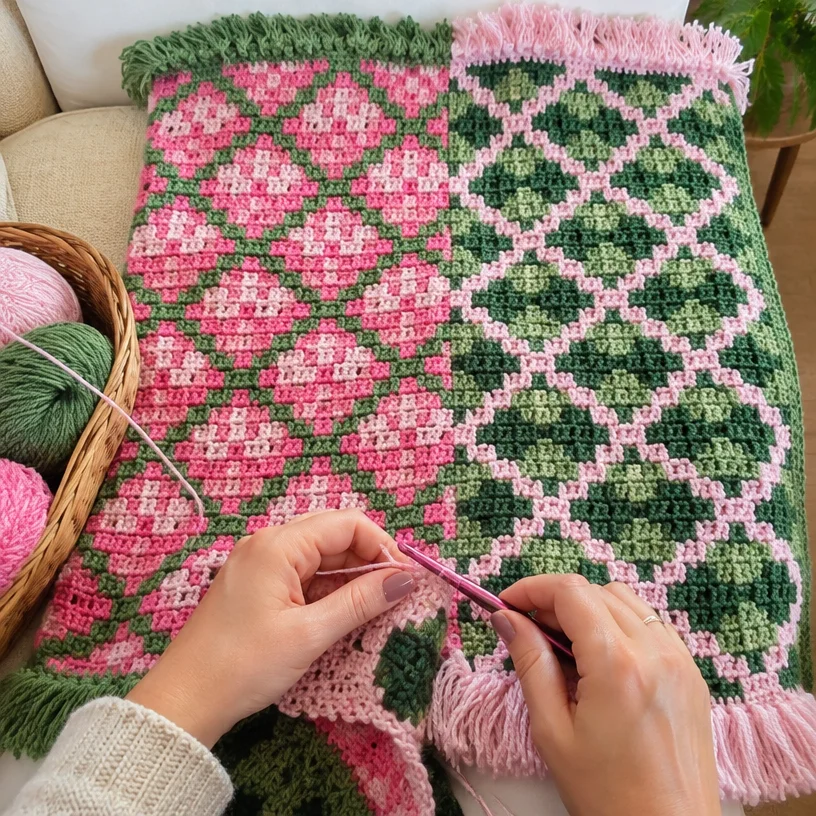
The Because I Knew You Crochet Blanket is a striking corner-to-corner project made from two coordinating panels. Soft pinks and gentle greens create an elegant argyle-inspired design, while surface slip-stitch lines add the signature diamond detail. It is a rewarding project for crocheters who know basic stitches and want to practice color changes, diagonal construction, panel seaming, and decorative finishing.
Thank you for reading this post, don't forget to subscribe!Why you’ll love this pattern
- Classic corner-to-corner construction: Each panel is worked diagonally in blocks, creating a satisfying rhythm as the blanket grows.
- Beautiful color arrangement: Baby Pink, Perfect Pink, Frosty Green, and Light Sage give the finished blanket a soft, balanced look.
- Useful skill building: The project introduces increasing, working even, decreasing, surface slip stitch, sewing panels, and adding fringe.
- A thoughtful handmade gift: The finished blanket is suitable for birthdays, weddings, housewarmings, or cozy seasonal gifting.
- Decorative without complicated texture: The argyle lines are created with surface slip stitches rather than difficult colorwork techniques.
- Relaxing to crochet: Once the block pattern is established, the repeated rows are easy to follow while watching television or listening to a podcast.
“The color changes made this blanket especially enjoyable to crochet. The panels came together neatly, and the surface slip-stitch lines really brought the argyle design to life.”
Before you begin
This project makes two large diagonal blanket panels. Each panel is worked corner to corner using groups of three double crochet stitches, commonly called C2C blocks. The panels first increase to their widest point, remain even through the middle section, and then decrease toward the opposite corner.
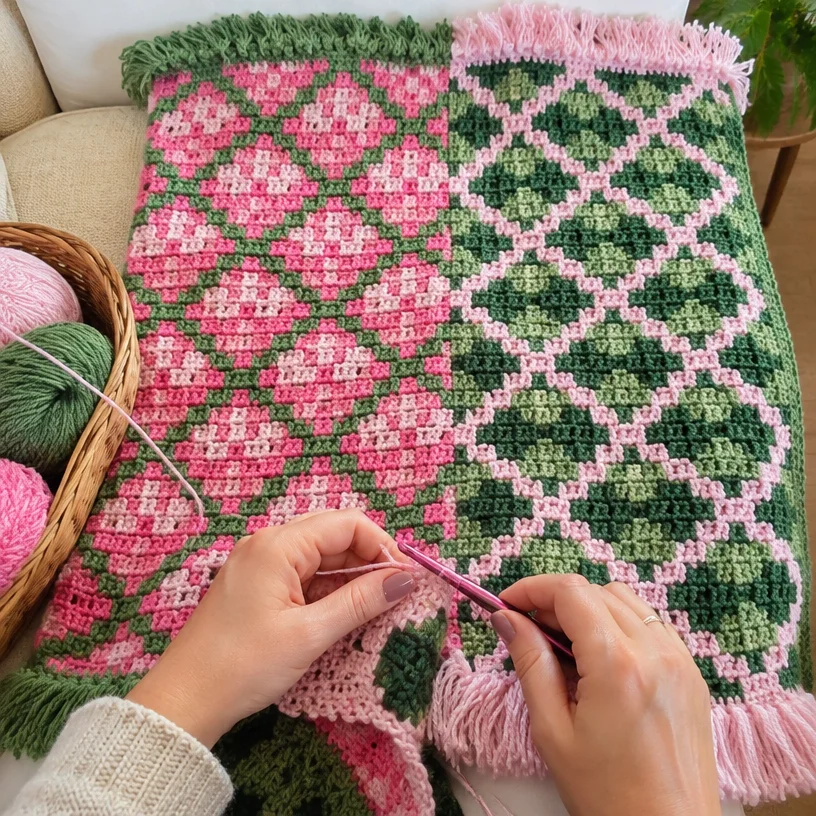
After both panels are complete, they are sewn together along the long edge. Surface slip-stitch lines are then added to create the argyle pattern. The blanket is finished with two-color fringe.
The pattern is best suited to an intermediate beginner or intermediate crocheter. You should be comfortable with chain stitches, double crochet, slip stitches, changing colors, and sewing crochet pieces together. The exact completion time will depend on your crochet speed, tension, and available time.
Materials you’ll need
Yarn
Use Red Heart® Super Saver® medium-weight yarn:
- Color 1/base: 1 ball of Red Heart® Super Saver®
7 oz/198 g; 364 yds/333 m - Contrast A — Baby Pink (0724): 3 balls, or approximately 850 yds/777.5 m
- Contrast B — Perfect Pink (0706): 2 balls, or approximately 625 yds/571.5 m
- Contrast C — Frosty Green (0661): 2 balls, or approximately 625 yds/571.5 m
- Contrast D — Light Sage (0631): 3 balls, or approximately 850 yds/777.5 m
The colors are assigned differently in each panel, so keep the balls clearly labeled before starting.
Tools
- U.S. I/9 (5.5 mm) Susan Bates® Silvalume® crochet hook, or the size needed to obtain gauge
- Susan Bates® yarn needle
- Scissors
- Measuring tape
- Optional stitch markers for tracking chart sections and color changes
Red Heart Super Saver is a medium-weight acrylic yarn. If you substitute another yarn, choose a similar medium-weight yarn and make a gauge swatch first. A different fiber, yarn thickness, or hook size can change the blanket’s size, drape, and yarn requirements.
How to crochet it
Before beginning, refer to the crochet diagram and color chart supplied with the original pattern. Each square of the chart represents one C2C block.
Set up the two panels
Make one panel using:
- Color 1: Contrast A — Baby Pink
- Color 2: Contrast B — Perfect Pink
- Color 3: Contrast D — Light Sage
Make the second panel using:
- Color 1: Contrast D — Light Sage
- Color 2: Contrast C — Frosty Green
- Color 3: Contrast A — Baby Pink
Keep the color chart nearby throughout the project. The color changes are part of the design, so check each row before beginning it.
Work the first blanket panel
The panels are worked diagonally from corner to corner.
-
With Color 1, chain 6.
-
First row, right side: Double crochet in the fourth chain from the hook. This counts as two double crochets. Double crochet in each of the last two chains. Turn. You now have one block.
-
Second row: Chain 6. Double crochet in the fourth chain from the hook, then double crochet in each of the next two chains to make the beginning block. In the next chain-3 space, work a slip stitch, chain 3, and 3 double crochets to make the next block. Turn. You now have two blocks.
-
Third row: Make the beginning block. Work one block in each chain-3 space across the row. Turn. You now have three blocks.
-
Increase section: Continue following the color chart. Repeat the last row pattern, adding blocks as shown, until the 31st row of the chart is complete. You should have 31 blocks in that row.
Work the sides even
-
32nd row: Make the beginning block. Work one block in each chain-3 space up to the last chain-3 space. Slip stitch in the last chain-3 space. Do not make a block there. Turn.
-
33rd row: Slip stitch in each of the first 3 double crochets. Work one block in each chain-3 space across the row. Turn.
-
Continue repeating the 32nd- and 33rd-row construction while following the color chart. Work until the 72nd row of the chart is complete.
This section keeps the number of blocks from increasing. Take care not to add an extra block at either edge.
Decrease toward the corner
-
73rd row, right side: Slip stitch in each of the first 3 double crochets. Work one block in each chain-3 space up to the last chain-3 space. Slip stitch in the last chain-3 space. Do not make a block there. Turn.
-
Continue repeating this decrease row, following the color chart, until only one block remains.
-
Fasten off.
-
Make the second panel using the second color arrangement:
- Color 1: Light Sage
- Color 2: Frosty Green
- Color 3: Baby Pink
Follow the same C2C instructions and the color chart for the second panel.
Add the argyle lines
The argyle lines are added with surface slip stitches after the panels are joined.
-
Hold Color 3 at the back of the work, on the wrong side.
-
Insert the hook from front to back at the point where the surface slip-stitch line begins. Pull up a loop.
-
Insert the hook into the next space and draw up a loop through the loop already on the hook.
-
Repeat the surface slip stitch along the line, following the argyle placement shown on the chart.
-
Keep the stitches loose. If you pull them too tightly, the blanket may pucker.
-
Fasten off at the end of each line.
-
Apply all argyle lines with Color 3 according to the chart.
Join the panels
Sew the two panels together along their long edges. Use a yarn needle and a length of coordinating yarn. Match the edges carefully and distribute the fabric evenly before sewing the seam.
A mattress stitch or an overcast seam can be used. Keep the seam flexible rather than pulling it tightly, since a tight seam can distort the diagonal blocks.
Add the fringe
-
Cut lengths of Contrast A and Contrast D measuring 12 inches (30.5 cm) each.
-
Take three strands together and fold them in half.
-
Insert the folded loop through the blanket edge, pull the loose ends through the loop, and tighten gently to form a fringe knot.
-
Space the fringe evenly across the blanket.
-
Place Contrast D fringe along the Baby Pink section.
-
Place Contrast A fringe along the Light Sage section.
Trim the ends evenly after all fringe has been attached.
Ways to use your finished project
- Drape the blanket over the back of a sofa or reading chair.
- Fold it at the foot of a bed for an elegant decorative accent.
- Use it as a cozy lap blanket in a living room, bedroom, or craft space.
- Give it as a handmade housewarming, wedding, birthday, or holiday gift.
- Style it with neutral furnishings to highlight the soft pink and green argyle design.
- Photograph it as a premium handmade item for a craft-fair display or online shop listing.
If you plan to sell a finished blanket, check the original designer’s terms regarding finished-item sales and pattern attribution.
How to care for your crochet project
Red Heart Super Saver is generally durable acrylic yarn, but always check the care information on your specific yarn labels.
- Wash using the recommended machine setting with cool or warm water.
- Use a mild detergent and avoid bleach unless the yarn label specifically permits it.
- Avoid high heat, which can affect the yarn’s surface and cause the blanket to lose its shape.
- Reshape the blanket while damp and dry it flat when possible.
- Do not hang the wet blanket, as its weight may stretch the panels and seam.
- Keep the surface slip-stitch lines and fringe from snagging during washing.
- Store the blanket clean and completely dry in a breathable container.
- Keep it away from rough surfaces that may increase pilling.
Blocking is optional, but gentle blocking can help straighten the joined edges and improve the overall shape. Avoid excessive heat when blocking acrylic yarn.
Tips for success
- Check the color key before every color change. The two panels use different color assignments.
- Count blocks, not just stitches. The increase section should reach 31 blocks, and the even section must finish at the chart’s 72nd row.
- Mark the right side. A removable stitch marker or safety pin can help you identify the right side while working the diagonal rows.
- Keep chain-3 spaces open. These spaces are where the next blocks are formed. Tight stitches make C2C construction difficult.
- Do not add a block during the even section. The 32nd and 33rd rows shape the sides without increasing the width.
- Keep the surface slip stitches loose. Tight decorative stitches can pull the fabric into ridges or puckers.
- Join panels on a flat surface. Lay the pieces together first and match their long edges before sewing.
- Secure yarn ends carefully. Weave in ends on the wrong side, especially near the seam and surface stitching.
- Measure fringe consistently. Cutting all strands at 12 inches before attaching them makes the finished edge look more polished.
- Make a gauge swatch if size matters. A different tension can affect the finished proportions and yarn usage.
Customize your project
Try a new color palette
Replace the pink and green combination with navy and cream, lavender and sage, autumn rust and gold, or a seasonal palette. Keep the contrast between neighboring colors clear so the argyle lines remain visible.
Use a single-color background
You can make the base colors more uniform while reserving a bold shade for the surface slip-stitch lines. This creates a cleaner, more graphic appearance.
Adjust the size
To make a smaller or larger blanket, you may be able to change the number of increase, even, or decrease rows. However, this pattern is organized around a specific chart, and changing the row sequence will alter the argyle layout. A larger version will also require additional yarn and may need a revised chart.
Change the fringe
Use longer fringe for a more dramatic finish or shorter fringe for a neater modern edge. Changing the number of strands will affect the fullness and yarn required.
Choose a different yarn
A similar medium-weight yarn can work, but a thicker yarn will make a heavier, larger blanket and use more material. A lighter yarn will create a smaller, more delicate blanket with less visual weight. Always swatch before committing to a substitute.
Frequently asked questions
Is this blanket pattern beginner-friendly?
It is suitable for an advanced beginner who understands double crochet, chains, slip stitches, and basic color changes. The C2C construction is repetitive, but reading the chart and adding surface slip stitches require careful attention.
What is the main technique used?
The blanket is worked corner to corner in blocks made from three double crochets. Surface slip stitches are added afterward to create the argyle lines.
How much yarn do I need?
You need one ball of the base Red Heart Super Saver yarn, plus approximately 850 yards each of Baby Pink and Light Sage, and approximately 625 yards each of Perfect Pink and Frosty Green.
Can I use a different hook size?
Yes, but changing the hook size will change your tension and may alter the blanket’s size, drape, and yarn usage. Use the hook size that produces the required gauge, and make a swatch when substituting hooks or yarn.
How do I keep the C2C edges even?
Count the blocks in each section and follow the increase, even, and decrease instructions carefully. During the even section, remember that one edge ends with a slip stitch instead of a new block, while the following row begins with slip stitches before the blocks.
Why are my surface slip-stitch lines puckering?
The stitches are probably too tight. Surface slip stitches should lie smoothly on the fabric. Loosen your tension and avoid pulling the working loop tightly after each stitch.
Can I make the blanket larger?
You can modify the number of rows, but the argyle chart will no longer match automatically. A larger blanket may require a redesigned chart, additional yarn, and adjusted fringe quantities.
How should I wash the finished blanket?
Follow the yarn-label instructions. For Red Heart Super Saver, gentle washing with mild detergent and cool or warm water is generally appropriate. Reshape the blanket and dry it flat or according to the label.
Can I sell blankets made from this pattern?
The provided pattern information does not state the designer’s policies for selling finished items. Check the original designer or publisher’s usage terms before listing or selling a finished blanket, and provide pattern credit if required.