Baby Play Mat Crochet Pattern
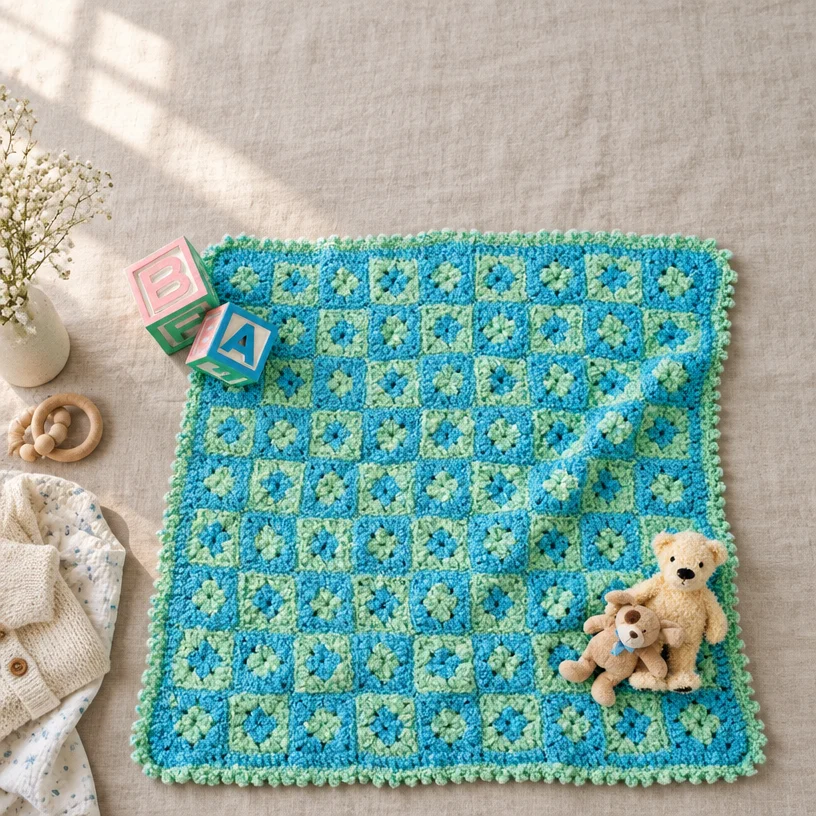
This post may contain affiliate links. If you buy through them we may earn a small commission at no extra cost to you. Learn more.
Engaging with the Crochet Baby Play Mat Pattern
Crocheting has always brought me joy, especially when creating items for little ones. Today, I’m excited to share a delightful Crochet Baby Play Mat Pattern that perfectly merges functionality with charm. This project is not only enjoyable to make but also serves as a beautiful, soft space for babies to play and explore. Whether you’re a seasoned crocheter or just starting, this pattern is accessible and rewarding, making it a fantastic addition to any nursery.
Why You’ll Love This Pattern
This crochet pattern stands out for several reasons:
- Beginner-Friendly: The simple granny square design allows new crocheters to build confidence while honing their skills.
- Skill-Building Value: As you learn working in rounds and joining squares, you’ll gain techniques that can be applied to future projects.
- Quick Completion: With a functional design and relatively straightforward stitches, you can whip up this play mat quickly.
- Shower Gift Potential: Handmade gifts hold a special place in any parent’s heart. This play mat makes for a loving and thoughtful gift.
- Home Décor Appeal: Use the play mat as a decorative piece in a nursery. Its softness and color combination make it a visually appealing item.
- Scrap-Yarn Suitability: If you have leftover yarn, this project is perfect for using it up while creating something practical.
- Relaxing Project: The repetitive nature of granny squares makes this a wonderful portable project that you can take on the go.
"I loved making this baby play mat! It was so rewarding to see it come together, and it became a cherished piece in my friend’s nursery." — A happy crocheter.
How This Crochet Pattern Comes Together
In this project, you will create a beautiful and practical play mat made up of colorful granny squares. The process begins with crocheting a total of 81 squares—41 in one color and 40 in another—and then assembling them in rows. This pattern primarily uses basic stitches, making it ideal for beginners and comfortable for more experienced crocheters. You can expect to complete the project in a few days, depending on your availability and skill level.
Materials You’ll Need
To create your Crochet Baby Play Mat, gather the following materials:
- Yarn:
- RED HEART® “Baby Clouds™”, Art. E710 (6 ounce skein)
- 24 ounces each of:
- No. 9517 Seaspray (CA)
- No. 9025 Blue Sky (CB)
- Hook: 8mm [US L/11]
- Optional: Yarn needle for weaving in ends
Keepsake Notes
- The yarn used, Baby Clouds™, is soft and gentle, making it perfect for babies.
- The 8mm hook will help achieve a nice drape and plush texture.
- Feel free to experiment with different color combinations to personalize your mat!
Step-by-Step Instructions
Follow these simple steps to create your play mat:
Granny Square 1 (Make 41)
- With color A (CA), chain 5 and join with a slip stitch to form a ring.
- Round 1 (right side):
- Chain 2 (counts as 1 hdc),
- Work 2 hdc into the ring, chain 2,
- Repeat [3 hdc, chain 2] 3 times,
- Join with a slip stitch to the top of the first chain-2.
- Fasten off.
- Round 2:
- Join color B (CB) with a slip stitch in any corner chain-2 space.
- Chain 3 (counts as 1 dc),
- Work (2 dc, chain 2, 3 dc) in the same space,
- Repeat for each of the 3 remaining corners,
- Join with a slip stitch to the top of the initial chain-3.
- Fasten off.
Granny Square 2 (Make 40)
- Round 1: Use color B (CB).
- Round 2: Use color A (CA).
Finishing (Assembly)
- Weave in all loose ends.
- Refer to the assembly diagram to join rows of 9 squares:
- Place Granny Square 1 and Granny Square 2 together, right sides facing.
- Join CA with a slip stitch through the first front loop of the front square and the corresponding back loop of the back square.
- Continue slip stitching across.
- Join 9 blocks to make one row; repeat to create 9 rows, then join all rows together.
Edging
-
Round 1 (with right side facing):
- Join CA with a slip stitch in any corner chain-2 space.
- Chain 3 (counts as first dc), work 4 dc in the same space.
- Continue to dc in each dc and chain space around, working 5 dc in each remaining corner space.
- Join round with a slip stitch to the top of the initial chain-3.
- Fasten off.
-
Round 2 (with right side facing):
- Join CB with a slip stitch in the same space as joining.
- Chain 1, *sc in the next 2 sts, chain 3, slip stitch in the last sc made (picot made); repeat from * around, joining with a slip stitch to the first sc.
- Fasten off and weave in any remaining loose ends.
Ways to Use Your Finished Project
Once completed, there are numerous ways to enjoy your crochet baby play mat:
- Baby Play Area: Create a safe and soft zone for infants and toddlers to play on.
- Nursery Accent: Use the mat as a colorful addition to the nursery décor.
- Gift Option: Gift it to expectant parents or for baby showers.
- Photography Prop: Use it as a backdrop for cute baby photos.
How to Care for Your Crochet Project
To ensure your play mat stays looking great, follow these care instructions:
- Hand Washing: Always hand wash with cool water using a mild detergent.
- Flat Drying: Lay flat to dry, reshaping the mat if needed to avoid stretching.
- Storage: Store in a cool, dry place when not in use, avoiding damp areas to prevent mildew.
Helpful Crochet Tips
To successfully navigate this project, keep these tips in mind:
- Maintain Even Tension: Practice consistent tension to ensure uniform squares.
- Count Stitches: Regularly check your stitch count to prevent mistakes.
- Use Stitch Markers: Pinpoint new rounds with markers to keep track of where to join.
- Securely Weave Ends: Ensure all ends are woven in to prevent unraveling.
- Blocking: After completion, consider blocking the mat to achieve even edges.
Customize Your Project
Feel free to personalize your play mat with these fun variations:
- Color Changes: Switch out colors for a seasonal theme or create a matching set.
- Adding Edgings: Incorporate decorative borders for added flair.
- Size Adjustments: Modify the number of squares for a larger or smaller mat.
- Embellishments: Consider adding embroidery or appliqués for unique touches.
Frequently Asked Questions
-
Is this crochet pattern beginner-friendly?
- Yes, the pattern is designed with beginners in mind, featuring basic stitches.
-
What yarn works best?
- RED HEART® “Baby Clouds™” is ideal for a soft and durable finish.
-
Can I use a different hook size?
- You can use a different size, but note that it may alter the mat’s final size and texture.
-
How long does the project take?
- Depending on your skill level and availability, you can complete it in a few days.
-
How should I wash the finished project?
- Hand wash in cool water and lay flat to dry to maintain its shape.
By following this guide, you’ll create a beautiful Crochet Baby Play Mat that not only showcases your skill but also serves a lovely purpose in the lives of little ones. Happy crocheting!