Baby Crochet Pullover Pattern
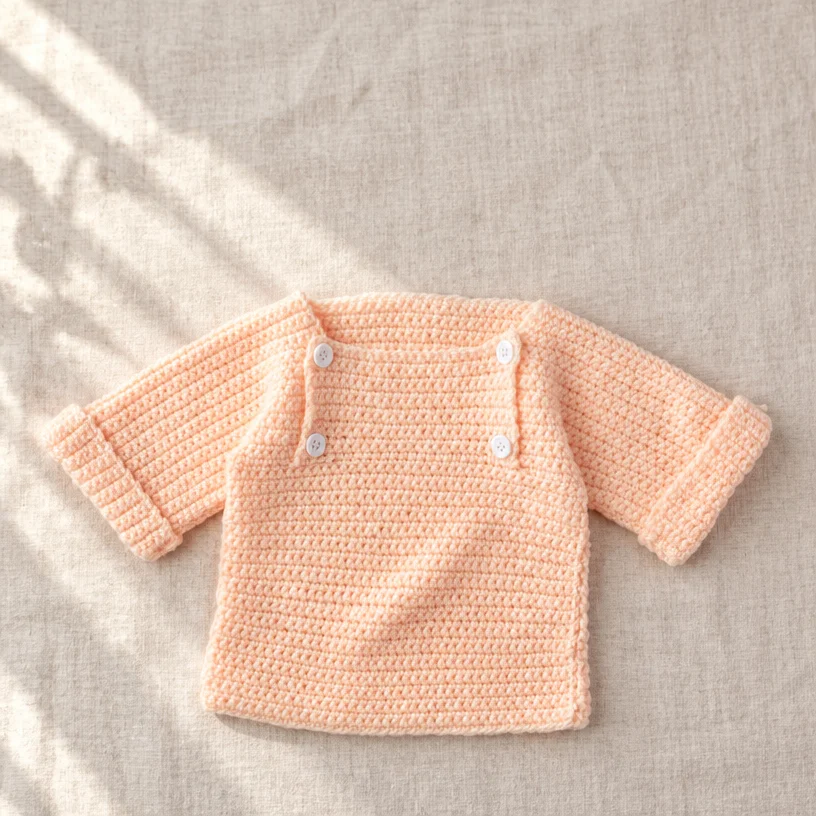
This post may contain affiliate links. If you buy through them we may earn a small commission at no extra cost to you. Learn more.
Engaging in the Crochet Baby Pullover
Crocheting a baby pullover is a delightful project for crafters of all skill levels. The joy of creating something cozy and adorable for a little one can be incredibly rewarding. This project serves as a great introduction for beginners, while also providing seasoned crocheters an opportunity to enhance their skills. Ideal for baby showers or as a charming gift, this pullover pattern allows you to express creativity in a practical way, resulting in a wonderful handmade item.
Why You’ll Love This Pattern
This crochet baby pullover pattern has several appealing features:
- Beginner-Friendly: The project uses basic stitches that are easy to learn and repeat, making it accessible for newcomers.
- Skill-Building Value: As you follow through with shaping and assembling techniques, you’ll improve your crochet skills.
- Quick Completion Time: This project can be completed fairly quickly, allowing you to make several pullovers in a short amount of time.
- Handmade Appeal: There’s something special about gifting or dressing a baby in a handmade item that carries personal touches.
- Perfect for Gifts: These cute pullovers are wonderful presents for new parents or as event gifts.
- Portable Project: Easy to transport, you can crochet on the go, whether you’re on a commute or at a picnic.
"I made this pullover for my niece, and it turned out absolutely adorable! The pattern was straightforward and fun to crochet."
How This Crochet Pattern Comes Together
In this project, you will create a lovely baby pullover suitable for ages ranging from 6 to 24 months. The design incorporates straightforward techniques, primarily focusing on single crochet stitches. This enables you to learn and adapt as you crochet, while the pattern’s structure helps you to visualize the finished item. Expect the project to take approximately a couple of evenings of focused crocheting.
Materials You’ll Need
Yarn and Other Supplies
- Yarn: Bernat® Baby Sport™ – 12.3 oz (350 g) for each size (6, 12, 18, 24)
- 1 ball for each pullover size (Peach Blossom color 21510)
- Note: 1 ball can make 3 (2-2-2) pullovers.
- Crochet Hook: Size U.S. G/6 (4 mm) or size needed to obtain gauge.
- Buttons: 4 for the front panel.
Important Note: Ensure you check the yarn label for care instructions, as it is crucial for maintaining the integrity of the garment.
Step-by-Step Instructions
Finished Chest Measurement:
- 6 months: 20” [51 cm]
- 12 months: 21” [53.5 cm]
- 18 months: 22” [56 cm]
- 24 months: 23” [58.5 cm]
BACK
- Begin at the lower edge of the Back, chain (ch) 41 (43-45-47).
- 1st Row:
- (RS – Right Side) 1 sc in 2nd ch from hook and each chain to end.
- Turn.
- Total: 40 (42-44-46) sc.
- 2nd Row:
- Ch 1, 1 sc in each sc to end, turn.
- Repeat row 2 until work measures approx 6 (7-7½-8)” [15 (18-19-20.5) cm], ending on a WS row. Fasten off.
SHAPE SLEEVES (Worked onto Back)
- 1st Row:
- (RS) Ch 26 (28-32-34). Join to Back, sc across next 40 (42-44-46) sc. Ch 27 (29-33-35), turn.
- 2nd Row:
- 1 sc in 2nd ch from hook and each of next 25 (27-31-33) ch, sc across Back, 1 sc in each of last 26 (28-32-34) ch, turn. Total: 92 (98-108-114) sc.
- 3rd Row:
- Ch 1, 1 sc in each sc to end, turn.
- Repeat until sleeve shaping measures approx 4 (4½-4½-5)” [10 (11.5-11.5-12.5) cm], ending on a WS row. Fasten off.
FRONT
- Work as for Back until you reach the relevant measurements for both sleeves and the front neck.
SHAPE LEFT SLEEVE AND FRONT NECK
- 1st Row:
- (RS) Ch 26 (28-32-34). Join to Front, sc across next 8 (8-9-9) sc, and in back loops only, 1 sc in next 4 sc, turn. Leave remaining unworked.
- 2nd Row:
- Ch 1, 1 sc in first 12 (12-13-13) sc, sc in last 26 (28-32-34) ch, turn.
- 3rd Row:
- Ch 1, 1 sc in each to end, turn.
- Continue until length matches Back, ending on a WS row. Fasten off.
SHAPE RIGHT SLEEVE AND FRONT NECK
- With RS facing, skip next 16 (18-18-20) sc. Join yarn with sl st to next sc. Ch 1, sc in same sp.
- Continue sc across the next few stitches, then work in both loops as per instructions. Complete as directed in previous steps.
FRONT PANEL WITH BUTTONHOLES
- Join yarn with sl st to the rem front loop at left front neck, working as instructed.
- Include buttonhole rows as described, ensuring to maintain the pattern’s flow.
FINISHING
- Pin work to measurements and cover with a damp cloth to dry. Sew shoulder and sleeve seams; sew side and sleeve seams, finishing with attaching buttons to align with the buttonholes.
Creative Ideas
Your finished baby pullover can serve many purposes. Here are some meaningful ways to utilize your delightful creation:
- Adorable everyday wear for babies.
- A charming gift for baby showers or birthdays.
- Creative photography prop for newborn sessions.
- A handmade treasure to pass down within the family.
How to Care for Your Crochet Project
To keep your baby pullover looking fresh, follow these care instructions:
- Hand wash in cool water using mild detergent.
- Avoid wringing the garment; instead, lay it flat to dry.
- Reshape while damp to maintain its form.
- Store in a cool, dry place to prevent damage.
Helpful Crochet Tips
Here are some handy crochet tips to ensure your success on this project:
- Maintain consistent tension for even stitches.
- Use stitch markers to track your place in the pattern.
- Always count your stitches after every row to avoid accidental increases or decreases.
- Keep your project flat on the surface to maintain an even shape.
Creative Variations
Feel free to personalize your pullover with these fun variations:
- Choose different colors for a unique take that matches seasonal themes.
- Experiment with contrasting borders or decorative edging.
- Embroider small designs or add appliqués for extra flair.
Frequently Asked Questions
-
Is this crochet pattern beginner-friendly?
Yes, it utilizes basic stitches and techniques. -
What yarn works best?
The recommended Bernat® Baby Sport™ provides a soft and suitable texture for babies. -
Can I use a different hook size?
You may, but ensure it matches the gauge for proper sizing. -
How long does the project take?
This pattern can typically be completed within a couple of evenings. -
How can I make it larger or smaller?
Adjust the number of starting chains and increase the stitch counts proportionately.