Bargello Crochet Baby Blanket Pattern
This post may contain affiliate links. If you buy through them we may earn a small commission at no extra cost to you. Learn more.
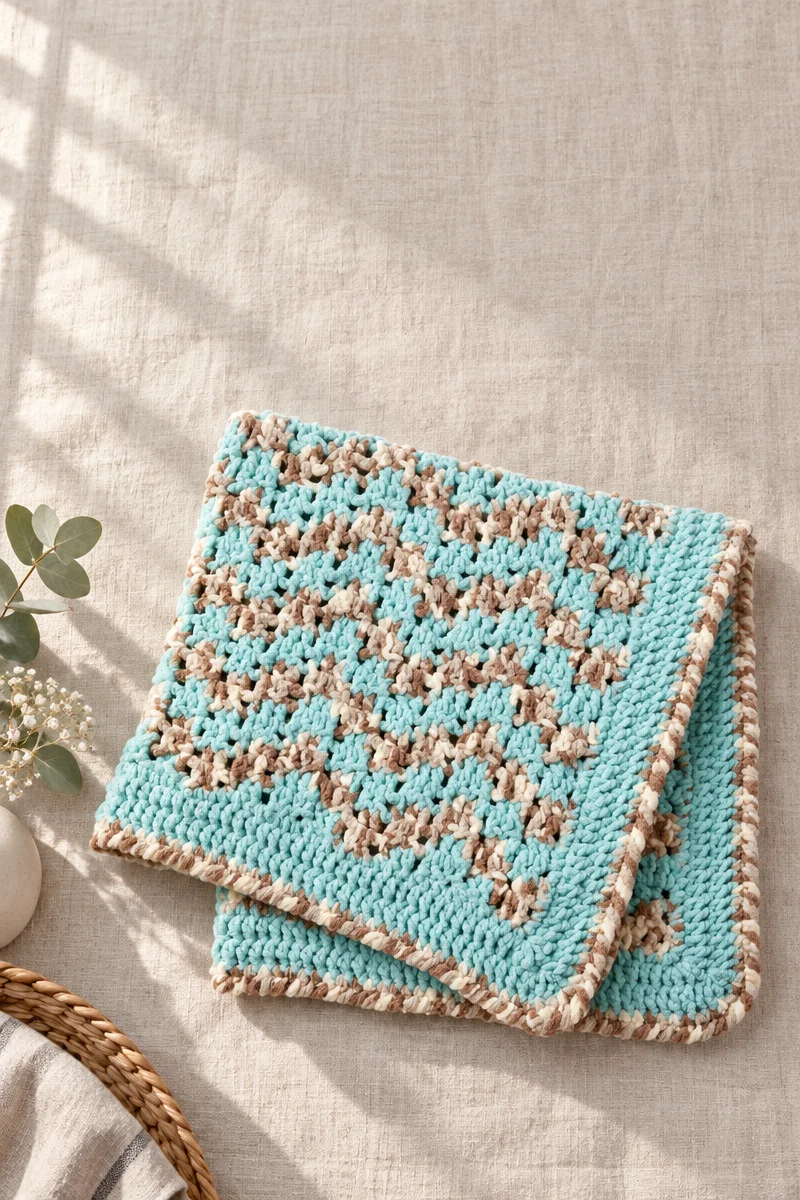
This Baby Bargello crochet blanket combines soft, plush yarn with an eye-catching openwork design. The repeating bands of Seafoam and Little Sand Castles create a gentle bargello-inspired effect, while the simple double crochet and slip-stitch pattern keeps the project approachable. It makes a thoughtful baby-shower gift, nursery blanket, or cozy handmade layer for a stroller or crib.
Thank you for reading this post, don't forget to subscribe!Why you’ll love this pattern
- Soft and comfortable: Bernat® Baby Blanket™ creates a thick, velvety fabric suitable for a baby blanket.
- Interesting but manageable: The design uses double crochet, chains, slip stitches, and skipped stitches to form its repeating motif.
- Great color impact: Alternating two contrast shades gives the blanket a bargello-style appearance without complicated colorwork.
- Useful handmade gift: Its generous blanket shape works well for baby showers, birthdays, and nursery décor.
- Skill-building: Crocheters can practice reading repeats, changing colors, working into chain spaces, and shaping a neat border.
- A satisfying project: The main body is built from a repeating four-row sequence, making it easy to settle into a relaxing rhythm.
“The color changes make this blanket look much more complicated than it is. Once I understood where to work the slip stitches, the rows became very relaxing, and the plush yarn made the finished blanket wonderfully soft.”
How this crochet blanket comes together
You will crochet a rectangular blanket beginning with a foundation chain of 116 stitches. The main body uses a repeating pattern of double crochet groups, chain-3 spaces, slip stitches, and skipped stitches.
The foundation row establishes the bargello-style structure. After that, you will work a four-row color repeat:
- Two rows with Contrast B.
- Two rows with Contrast A.
Continue the repeat until the blanket measures approximately 38 inches (96.5 cm), ending on a third row. Small fill-in sections are then worked across the final row, along the bottom edge, and at the corners. A five-round border completes the blanket.
The pattern is suitable for an adventurous beginner or intermediate crocheter. The stitches are not difficult, but careful counting and attention to the turning and joining instructions are important. The total working time depends on your crochet speed and tension.
Materials you’ll need
- Bernat® Baby Blanket™, 3.5 oz/100 g; 72 yds/65 m:
- Contrast A: Seafoam (03736): 6 balls, approximately 430 yds/393 m
- Contrast B: Little Sand Castles (03011): 6 balls, approximately 370 yds/337 m
- Crochet hook: U.S. L/11 (8 mm), such as Susan Bates® Silvalume®, or the size needed to obtain gauge
- Yarn needle: Susan Bates®
- Scissors
- Optional stitch markers for identifying the right side and color-change points
Bernat® Baby Blanket™ is a bulky, chenille-style yarn with a plush feel. Because thick yarn can make stitches difficult to see, use good lighting and check your work regularly. If you substitute another yarn, choose a similar bulky yarn, but expect the blanket’s size, drape, texture, and yarn requirements to change.
Step-by-step instructions
Stitch key
- ch: chain
- sl st: slip stitch
- dc: double crochet
- sc: single crochet
- reverse sc: reverse single crochet, also called crab stitch
- RS: right side
- WS: wrong side
Chart symbols:
- ○ = chain
- • = slip stitch
- Double vertical symbol with a cross = double crochet
Main body
-
Make the foundation chain.
With Contrast A, chain 116. The foundation chain follows a multiple of 22 chains plus 6. -
Work the foundation row on the right side.
Make 1 dc in the 4th chain from the hook, then 1 dc in the next chain.Work the following sequence twice:
- Chain 3.
- Slip stitch in the next chain.
- Skip the next 3 chains.
- Make 1 dc in each of the next 2 chains.
Then:
- Skip the next 2 chains.
- Slip stitch in the next chain.
- Chain 3.
- Make 1 dc in each of the next 2 chains.
- Skip the next 2 chains.
- Slip stitch in the next chain.
-
Repeat the main foundation sequence.
Repeat the following sequence from the asterisk across the row until 3 chains remain:- Chain 3.
- Make 1 dc in each of the next 2 chains.
- Chain 3.
- Slip stitch in the next chain.
- Skip the next 3 chains.
- Make 1 dc in each of the next 2 chains.
- Chain 3.
- Slip stitch in the next chain.
- Skip the next 3 chains.
- Make 1 dc in each of the next 2 chains.
- Skip the next 2 chains.
- Slip stitch in the next chain.
- Chain 3.
- Make 1 dc in each of the next 2 chains.
- Skip the next 2 chains.
- Slip stitch in the next chain.
-
Finish the foundation row.
Chain 3, then make 1 dc in each of the last 3 chains. Turn.
First patterned row
-
Chain 3. Make 1 dc in each of the next 2 dc.
-
Repeat the following sequence twice:
- Chain 3.
- Slip stitch in the top of the chain-3 from the previous row.
- Make 1 dc in each of the next 2 dc.
-
Work the next sequence twice:
- Slip stitch in the top of the chain-3 from the previous row.
- Chain 3.
- Make 1 dc in each of the next 2 dc.
-
Repeat the established sequence across the row until the last stitch. Make 1 dc in the top of the chain-3 from the previous row.
-
Join Contrast B and turn.
Four-row color repeat
-
Rows 2 and 3: With Contrast B, work the same stitch sequence as the first patterned row.
-
Rows 4 and 5: With Contrast A, work the same stitch sequence as the first patterned row.
-
Continue the pattern.
Repeat the last four rows until the blanket measures approximately 38 inches (96.5 cm) from the beginning. Finish after a third row, then fasten off.
Keep the color changes tidy by joining the new shade at the end of the required row. Avoid pulling the chenille yarn too tightly, since tight joins can distort the edge.
Fill-in sections across the last row
Work the fill-in rows across the last row of the blanket to close the open gaps.
-
Fill-in row 1: With the right side facing, join Contrast A with a slip stitch to the 4th stitch of the last row, at the top of the chain-3.
- Make 1 dc in each of the next 2 dc.
- Chain 3.
- Slip stitch in the top of the chain-3 from the previous row.
- Make 1 dc in each of the next 2 dc.
- Slip stitch in the top of the chain-3 from the previous row.
- Chain 3.
- Make 1 dc in each of the next 2 dc.
- Slip stitch in the top of the chain-3 from the previous row.
- Turn.
-
Fill-in row 2:
- Slip stitch in each of the first 2 dc and in the top of the next chain-3.
- Make 1 dc in each of the next 2 dc.
- Slip stitch in the top of the chain-3 from the previous row.
- Fasten off.
-
Repeat Fill-in rows 1 and 2 across the last row, filling the remaining gaps.
Fill-in sections across the bottom edge
- Repeat Fill-in rows 1 and 2 across the bottom edge of the blanket, working into the foundation chain.
Fill-in right corner
-
Turn the blanket upside down with the wrong side facing. Join Contrast B with a slip stitch to the first stitch, which is the 3rd chain of the foundation chain.
-
Right corner row 1:
- Chain 3.
- Make 1 dc in each of the next 2 chains.
- Skip the next 2 chains.
- Slip stitch in the next chain.
Repeat this sequence twice, then turn.
-
Right corner row 2:
- Slip stitch in each of the first 2 dc and in the top of the chain-3.
- Make 1 dc in each of the next 2 dc.
- Make 1 dc in the top of the chain-3.
- Fasten off.
Fill-in left corner
-
With the wrong side facing and the blanket upside down, join Contrast B with a slip stitch to the 11th foundation chain from the left edge. This is at the top-right of the area being filled in.
-
Make 1 dc in each of the next 2 chains.
-
Chain 3, then slip stitch in the top of the chain-3.
-
Make 1 dc in each of the next 3 chains, then turn.
-
For the listed finishing line of the left corner, chain 3, make 1 dc in each of the next 2 dc, and slip stitch in the top of the next chain-3. Fasten off.
Border
-
First round: With the right side facing, join Contrast A with a slip stitch to any corner.
- Chain 1.
- Work sc evenly around the blanket.
- Work 3 sc in each corner.
- Join with a slip stitch to the first sc.
-
Second and third rounds: With Contrast A, chain 3.
- Work dc evenly around.
- Work 5 dc in each corner.
- Join with a slip stitch to the top of the chain-3.
- At the end of the third round, join Contrast B.
-
Fourth round: With Contrast B, chain 1.
- Make 1 sc in each dc around.
- Work 3 sc in each corner.
- Join with a slip stitch to the first sc.
-
Fifth round: With Contrast B, chain 1.
Work 1 reverse sc in each sc around, moving from left to right instead of the usual right-to-left direction. This creates the textured crab-stitch edge.
-
Join with a slip stitch to the first sc and fasten off.
-
Weave in all loose ends securely with a yarn needle. Trim the ends only after they are woven through several stitches.
Ways to use your finished blanket
- Drape it over a nursery rocking chair or reading chair.
- Fold it at the foot of a crib or toddler bed.
- Use it as a stroller or car-seat blanket, making sure it does not cover a baby’s face.
- Give it as a baby-shower, newborn, birthday, or christening gift.
- Pair it with a coordinating hat, booties, or soft toy for a handmade baby set.
- Photograph it as a nursery accessory or include it in a handmade-gift basket.
- Offer finished blankets at craft fairs or in a handmade shop, provided you follow the original pattern designer’s usage terms.
How to care for your crochet project
Bernat® Baby Blanket™ is a plush synthetic-style yarn, but always check the label on your specific balls before washing.
- Follow the yarn-label washing instructions.
- Use a gentle cycle and cool or lukewarm water if machine washing is permitted.
- Wash the blanket separately the first time to check for color transfer.
- Use a mild detergent and avoid bleach or harsh fabric softeners.
- Do not wring or twist the blanket, as the weight of wet yarn can stretch the fabric.
- Reshape the blanket while damp and dry it flat on a clean surface.
- Avoid hanging it while wet.
- Keep it away from excessive heat, which may damage or flatten plush fibers.
- Store it clean and completely dry, folded loosely in a breathable container.
- Avoid pressing heavy items on top of it for long periods, as this can crush the texture.
Tips for success
- Use a stitch marker for the right side. The color changes and textured pattern can make it easy to lose track of which side is facing.
- Count the first few repeats carefully. The pattern depends on consistent groups of double crochet stitches and chain-3 spaces.
- Do not tighten slip stitches. Loose, flexible slip stitches make it easier to work the following row and help prevent puckering.
- Check the foundation chain. A tight foundation chain can pull the bottom edge narrower than the rest of the blanket. Use a relaxed grip or a slightly larger hook for the chain if necessary.
- Keep the turning chain consistent. The chain-3 at the start of a row forms part of the edge structure.
- Use good lighting. Plush yarn can hide individual loops. Feel for the top of stitches when working slip stitches.
- Check the blanket’s width before continuing too far. If it is noticeably narrower or wider than expected, adjust your tension early.
- Do not skip the fill-in work. These sections close the gaps at the edges and prepare the blanket for a smoother border.
- Work the corners evenly. The specified corner stitch counts help the border lie flat rather than curl.
- Weave in ends securely. Chenille-style yarn can slip out if the tail is woven through only one or two stitches.
Customize your project
- Change the color palette: Use soft pink and cream for a traditional nursery look, blue and gray for a cool-toned version, or mustard and rust for a warmer modern palette.
- Keep Contrast A as the dominant shade: This preserves the original visual rhythm while allowing Contrast B to create a stronger accent.
- Use a contrasting border: A dark or bright final border can frame the bargello design more dramatically.
- Adjust the length: Repeat or omit complete four-row pattern repeats. The width is established by the foundation chain, while the length changes through the number of repeats.
- Make a wider blanket: Add foundation-chain repeats according to the pattern’s multiple of 22 chains plus 6. A wider foundation changes the yarn requirement and may require additional balls.
- Add a simple appliqué: A small star, heart, or flower can personalize a gift, but secure all decorations firmly and avoid loose embellishments on items intended for unsupervised babies.
- Create a coordinating set: Use the same two colors for a baby hat, cushion, or small lap blanket made from suitable patterns.
- Try another bulky yarn: A similar yarn may work, but differences in thickness, fiber, and stitch definition can affect the drape, final dimensions, and amount of yarn required.
Frequently asked questions
Is this Baby Bargello crochet blanket beginner-friendly?
It is suitable for an adventurous beginner who knows basic crochet stitches. The main stitches are chains, slip stitches, double crochet, and single crochet. Beginners should work slowly through the foundation row and check each repeat before continuing.
What yarn works best for this blanket?
The specified yarn is Bernat® Baby Blanket™ in Seafoam and Little Sand Castles. Its bulky, plush texture creates a soft and warm fabric. A substitute should be similar in thickness, but it may change the blanket’s size, feel, and drape.
Can I use a different hook size?
Yes, use the hook size needed to obtain the correct gauge. A larger hook generally creates a looser, drapier fabric, while a smaller hook creates a denser fabric. Changing the hook can also affect the final dimensions and yarn usage.
How much yarn do I need?
The pattern calls for 6 balls of Contrast A, approximately 430 yards/393 meters, and 6 balls of Contrast B, approximately 370 yards/337 meters. It also lists Bernat® Baby Blanket™ as 3 balls, so check your pattern packaging and purchase enough yarn from the same dye lot when possible.
How do I make the blanket wider?
Adjust the foundation chain using the stated multiple of 22 chains plus 6. Add or remove complete 22-chain sections rather than changing the chain count randomly. A wider blanket will require more yarn.
How do I make it longer?
Repeat the four-row pattern sequence for additional length. Finish after a third row as directed before working the fill-in sections. Extra repeats increase yarn use.
Why are my edges curling?
Curling can result from tight tension, a tight foundation chain, or uneven border spacing. Check that your chain-3 spaces are not pulled tight, work the border evenly, and maintain the specified corner stitch counts.
How do I keep the border flat?
Work evenly around each side and place the correct number of stitches in every corner: 3 sc in the first round, 5 dc in the second and third rounds, and 3 sc in the fourth round. Too few corner stitches may pull the blanket inward; too many can create ruffles.
Can I machine wash the finished blanket?
Use the care instructions on the yarn label first. If machine washing is allowed, choose a gentle cycle with cool or lukewarm water, avoid harsh products, and dry the blanket flat if possible.
Can I sell blankets made from this pattern?
The source information does not specify permissions for selling finished items. Check the original designer’s or publisher’s usage terms before selling blankets made from the pattern, and do not distribute or resell the written instructions.