Baby’s First Beach Ball Pattern
This post may contain affiliate links. If you buy through them we may earn a small commission at no extra cost to you. Learn more.
Why you’ll love this pattern
Crocheting Baby’s First Beach Ball is a delightful experience that combines creativity with the joy of making something special for little ones. This project is wonderfully beginner-friendly, making it an ideal choice for those just starting their crochet journey. Not only is it quick to complete, but the cheerful colors and playful design also make it a charming gift for baby showers or new parents. Plus, it’s perfect for brightening up a nursery or playroom!
"I loved making the beach ball for my niece! It was so easy to follow and turned out so cute!"
How this crochet pattern comes together
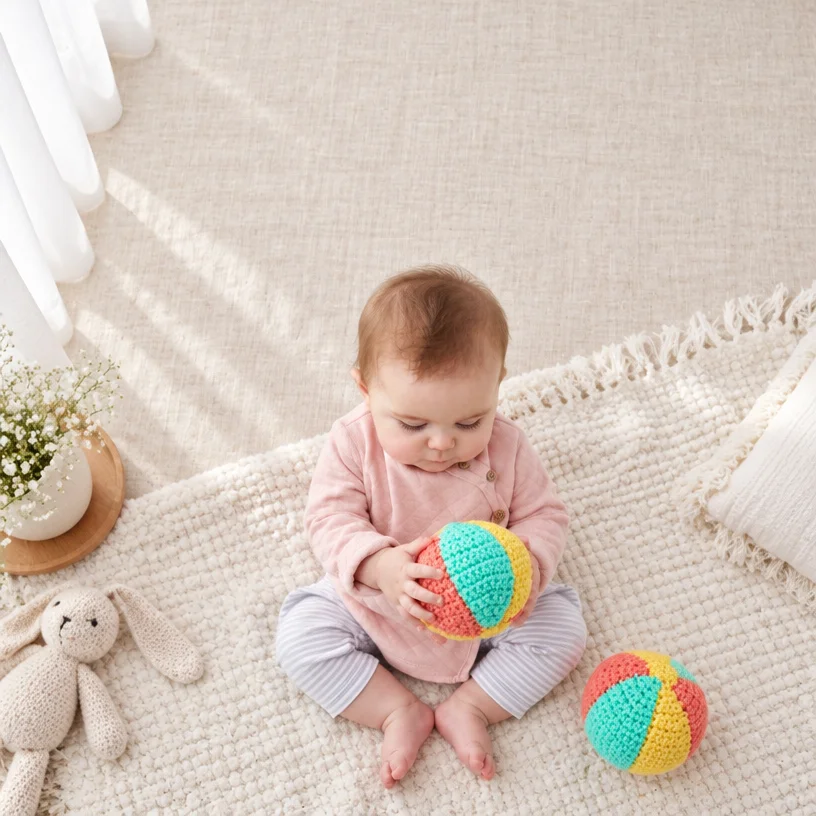
This crochet pattern guides you through making a fun, colorful beach ball perfect for babies. You’ll start by creating six side sections, two each in three different colors, followed by two circular ends. The main technique used here is single crochet, with simple increases and decreases to shape the ball. Designed to be accessible for beginners, you could complete this in a weekend, making it a satisfying and practical crochet project.
Materials you’ll need
To crochet your Baby’s First Beach Ball, gather the following materials:
- RED HEART® Baby Hugs™ Medium Yarn
- 1 ball each of:
- 4625 Sprout A
- 4258 Peachie B
- 4201 Sunny C
- 1 ball each of:
- Yarn needle
- Polyester fiberfill
- Susan Bates® Crochet Hook: 4 mm [US G-6]
Choose yarns that are soft and safe for babies, like Baby Hugs, known for its gentle fibers. The 4 mm hook is perfect for creating beautifully tight stitches that will hold up against tiny hands.
Step-by-step instructions
Color Assignment
- Use Color A = 4625 Sprout A
- Use Color B = 4258 Peachie B
- Use Color C = 4201 Sunny C
BALL: Side Section (make 6: 2 each with A, B, and C)
- Ch 2.
- Row 1 (wrong side): Ch 1, sc in 2nd ch from hook, turn—1 sc.
- Row 2: Ch 1, 2 sc in sc, turn—2 sc.
- Row 3: Ch 1, 2 sc in first sc, sc in next sc, turn—3 sc.
- Row 4: Ch 1, sc in first sc, 2 sc in next sc, sc in last sc, turn—4 sc.
- Row 5: Ch 1, sc in first sc, 2 sc in next sc, sc in last 2 sc, turn—5 sc.
- Row 6: Ch 1, sc in first 2 sc, 2 sc in next sc, sc in last 2 sc, turn—6 sc.
- Row 7: Ch 1, sc in first 3 sc, 2 sc in next sc, sc in last 2 sc, turn—7 sc.
- Row 8: Ch 1, sc in first 3 sc, 2 sc in next sc, sc in last 3 sc, turn—8 sc.
- Row 9: Ch 1, sc in first 4 sc, 2 sc in next sc, sc in last 3 sc, turn—9 sc.
- Row 10: Ch 1, sc in first 4 sc, 2 sc in next sc, sc in last 4 sc, turn—10 sc.
- Rows 11–13: Ch 1, sc in each sc across, turn.
- Row 14: Ch 1, sc in first 4 sc, sc2tog, sc in last 4 sc, turn—9 sc.
- Row 15: Ch 1, sc in first 3 sc, sc2tog, sc in last 4 sc, turn—8 sc.
- Row 16: Ch 1, sc in first 3 sc, sc2tog, sc in last 3 sc, turn—7 sc.
- Row 17: Ch 1, sc in first 2 sc, sc2tog, sc in last 3 sc, turn—6 sc.
- Row 18: Ch 1, sc in first 2 sc, sc2tog, sc in last 2 sc, turn—5 sc.
- Row 19: Ch 1, sc in first sc, sc2tog, sc in last 2 sc, turn—4 sc.
- Row 20: Ch 1, sc in first sc, sc2tog, sc in last sc, turn—3 sc.
- Row 21: Ch 1, sc in first sc, sc2tog, turn—2 sc.
- Row 22: Ch 1, sc2tog—1 sc.
- Fasten off, leaving a long tail for sewing.
BALL: Circle (make 2 with C)
- Ch 2.
- Round 1: 6 sc in 2nd ch from hook, do not join—6 sc.
- Round 2: 2 sc in each sc around, join with slip st in first sc.
- Fasten off, leaving a long tail for sewing.
FINISHING (assembly and finishing)
- With right sides together, back stitch sections together while referencing the photo for color sequence.
- When joining the last two sections:
- Back stitch to the midpoint,
- Turn the piece right side out,
- Stuff firmly with fiberfill,
- Sew the remaining edges.
- Weave the end tail around the top and bottom openings, pulling gently to close.
- Cover each end with a circle and sew in place.
- Weave in any remaining ends.
The back stitch is used as the joining method, as shown in the pattern diagram.
Creative ideas
Your finished beach ball can serve various purposes! It’s perfect as a soft toy for babies, making it a great gift item. Use it as a playful decor accent in a nursery or living area. This fun piece can also be used for themed decorations at a summer party or even as a prop in baby photos.
How to care for your crochet project
To ensure your Baby’s First Beach Ball stays looking fresh, hand wash it with cold water using a mild detergent. Lay it flat to dry, and reshape it gently if needed to maintain its form. Avoid machine washing to prevent pilling or stretching. Store it in a cool, dry place, away from direct sunlight to preserve the colors.
Helpful crochet tips
Here are some tips to keep in mind while working on your beach ball:
- Maintain even tension throughout to avoid uneven stitches.
- Count your stitches frequently to ensure you don’t accidentally skip any.
- Use stitch markers to mark your starting point or any difficult sections.
- Remember to easily track your color changes.
- Take your time with assembly to ensure a neat finish.
- Finish with blocking to give your ball a polished look before gifting.
Creative variations
Feel free to personalize your beach ball! Experiment with different color combinations or even add decorative borders for flair. You can change the size by adjusting your hook size or yarn weight, but keep in mind this may alter the overall look and feel. Consider adding embroidered designs or fun appliqués to make the ball uniquely yours!
Frequently asked questions
-
Is this crochet pattern beginner-friendly?
Yes, this pattern is designed for beginners. -
What yarn works best?
RED HEART® Baby Hugs™ Medium yarn is recommended for its softness and safety for babies. -
Can I use a different hook size?
While a 4 mm hook is ideal, using a different size may affect the overall size and texture of the ball. -
How long does the project take?
Most crocheters can complete this beach ball in a weekend. -
How can I make it larger or smaller?
Adjusting your hook size and yarn weight will change the dimensions of your project.